mapry LA03 Android App Manual
mapry LA03
This is a user manual that describes how to use the hardware device "LA03" that works in conjunction with the Android app mapry.
Although there is no limit to the continuous operation time per measurement for the mapry LA03, we recommend up to 30 minutes. *One measurement refers to the time from the start to the end of one scan.
When storing the mobile battery, do not leave it in an environment below 0 degrees.
If the mobile battery is cold, it may not be able to provide enough power to your device and it may not work.
Update history
| Manual Version | Software Version | Updated | Updates | overview |
|---|---|---|---|---|
| 1.3 | Android(1.0.76) LA03(3.4.6) |
2024/9/11 | 2.2.3. Settings screen | Added information about measurement route display settings |
| 〃 | 〃 | 〃 | 2.2.5. Start Scan | Added information on how to start scanning |
| 〃 | 〃 | 〃 | 2.2.8. Marker placement | Added information about adding marker types |
| 1.2 | Android(1.0.70) LA03(3.4.4) |
May 24, 2024 | 2.2.2. Routing and Display | Added specification change for route creation method |
| 1.1 | 〃 | May 23, 2024 | 1. Advance preparation | Added notes on battery handling and replaced images |
| 1.0 | Android(1.0.57) LA03(3.4.4) |
2024/01/12 | - | Image replacement due to UI change |
| 〃 | 〃 | 〃 | 2.2.5. Start Scan | Added error check when starting scan |
| 0.9 | Android(1.0.56) LA03(3.4.4) |
2023/12/27 | - | Deleted the selection of coordinate conversion method |
| 0.9 | Android(1.0.54) LA03(3.4.4) |
2023/12/20 | - | Image replacement, some text correction |
| 0.8 | Android(1.0.45) LA03(3.4.4) |
2023/11/28 | 8. How to attach the strap | Content Updates |
| 〃 | 〃 | 〃 | 9. How to install the LA03 | 〃 |
| 0.7 | Android(1.0.45) LA03(3.4.4) |
2023/10/10 | 6. Software Updates | Added information about software updates |
| 〃 | 〃 | 〃 | 2.2.7. Autosave | Added information about automatic saving of scan data |
| 0.6 | Android(1.0.42) LA03(3.4.3) |
2023/09/20 | 2.2.5. Scan Settings | Added information about saving scan starting point and route points |
| 0.5 | Android(1.0.39) LA03(3.4.2) |
2023/08/18 | 2.2.4. Settings screen | Added about scan density |
| 0.4 | Android(1.0.37) LA03(3.4.1) |
2023/08/1 | 1.4. Turning the fan on and off , 8. How to attach the strap | Added instructions on how to use the fan and attach the strap |
| 0.3 | Android(1.0.36) LA03(3.4.1) |
2023/07/25 | Added information about coordinate conversion and compass | |
| 0.2 | Android(1.0.33) LA03(3.4.1) |
2023/07/14 | ||
| 〃 | 〃 | 〃 | 3.3. Importing point cloud data | Layout and function modifications |
| 〃 | 〃 | 〃 | 3.4. Displaying point cloud data | Layout and function modifications |
| 0.1 | Android(1.0.32) LA03(3.4.1) |
04/07/2023 | Create new | - |
table of contents
1. Advance preparation
1.1. Connection (USB memory)
1.2. Connection (Mobile Battery)
1.3. Turning the fan on and off
1.4. Turn on Wi-Fi reception
2. LA03 operation screen
2.1. Screen display
2.2. Screen details
2.2.1. Scan preparation
2.2.2. Routing and Display
2.2.2.1 Directional Indication
2.2.2.2 Map display and zoom
2.2.2.3 Map Layers
2.2.2.4 Select points
2.2.2.5 Route Creation
2.2.2.6 Create from Points
2.2.2.7 Manual Creation
2.2.3. Settings screen
2.2.4. Scan Settings
2.2.5. Start Scan
2.2.6. Autosave
2.2.7. Automatic marker placement
2.2.8. Marker placement
2.2.9. Stop Scanning
2.2.10. USB Storage
3. Displaying point cloud data on Android devices
3.1. Displaying the results list screen
3.2. Connecting a USB memory
3.3. Importing point cloud data
3.4. Displaying point cloud data
4. Other button explanations
5. Location of point cloud data storage in USB memory
6. Software Updates
7. FAQ
8. How to attach the strap
9. How to install the LA03
1. Advance preparation
Do not leave the mobile battery in an environment below 0 degrees.
If the mobile battery is cold, it may not be able to provide enough power to your device and it may not work.
The included battery may change depending on the shipping time. Even if the terminal shape is the same, it may not be able to output the power required to drive the LA series, so please do not use the terminals listed below.
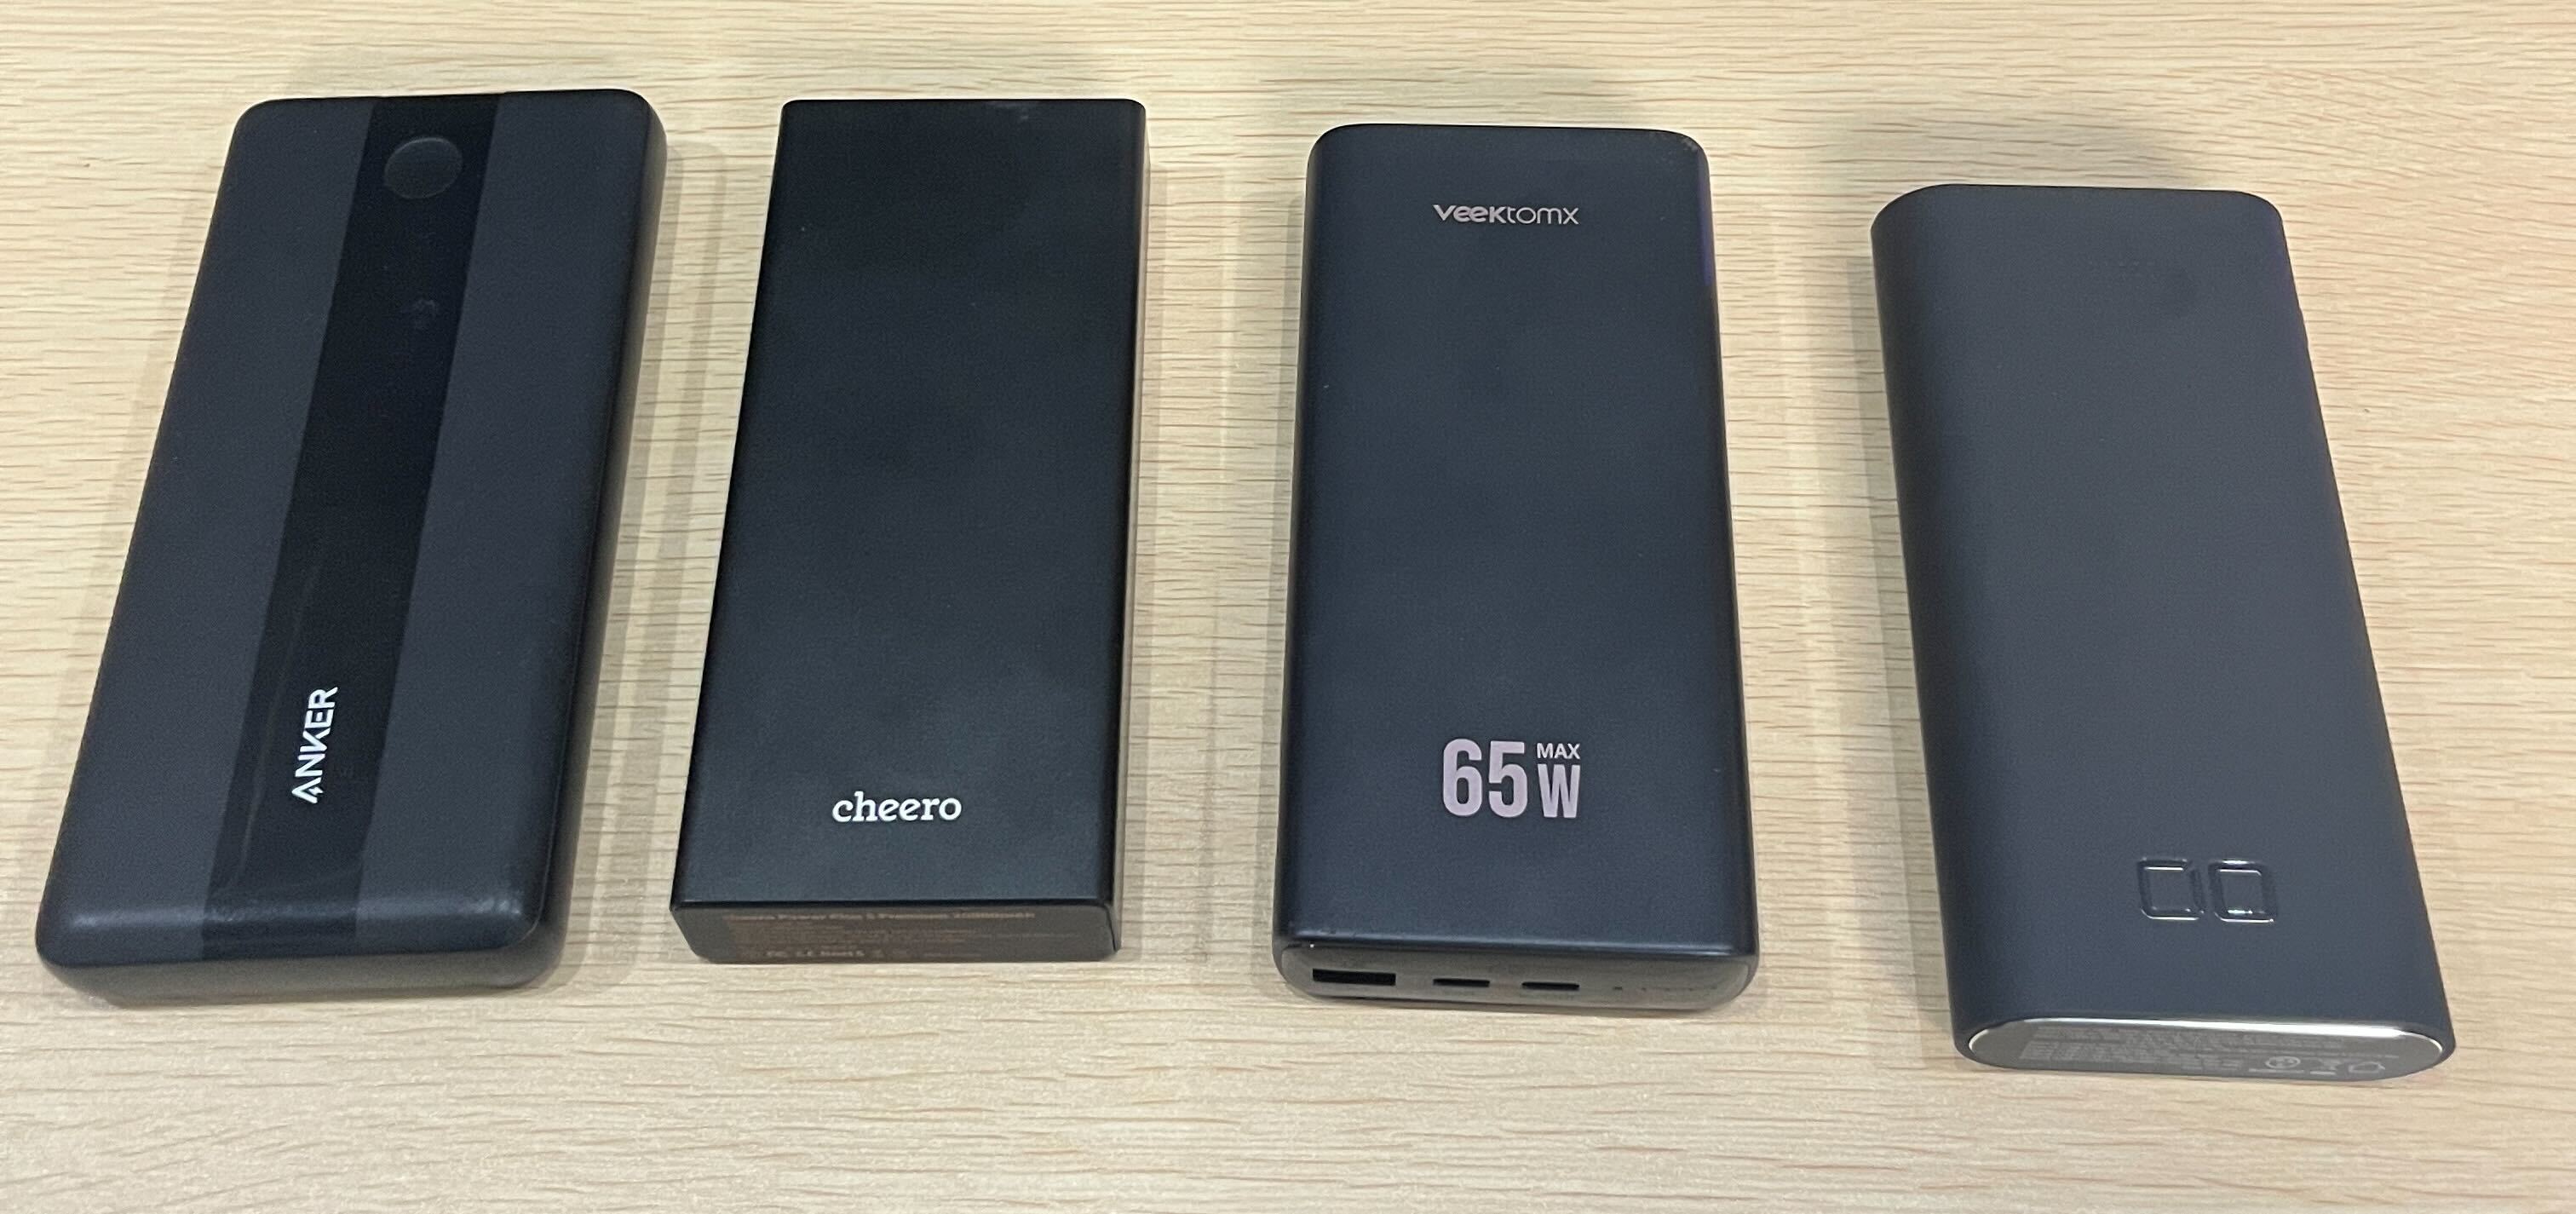
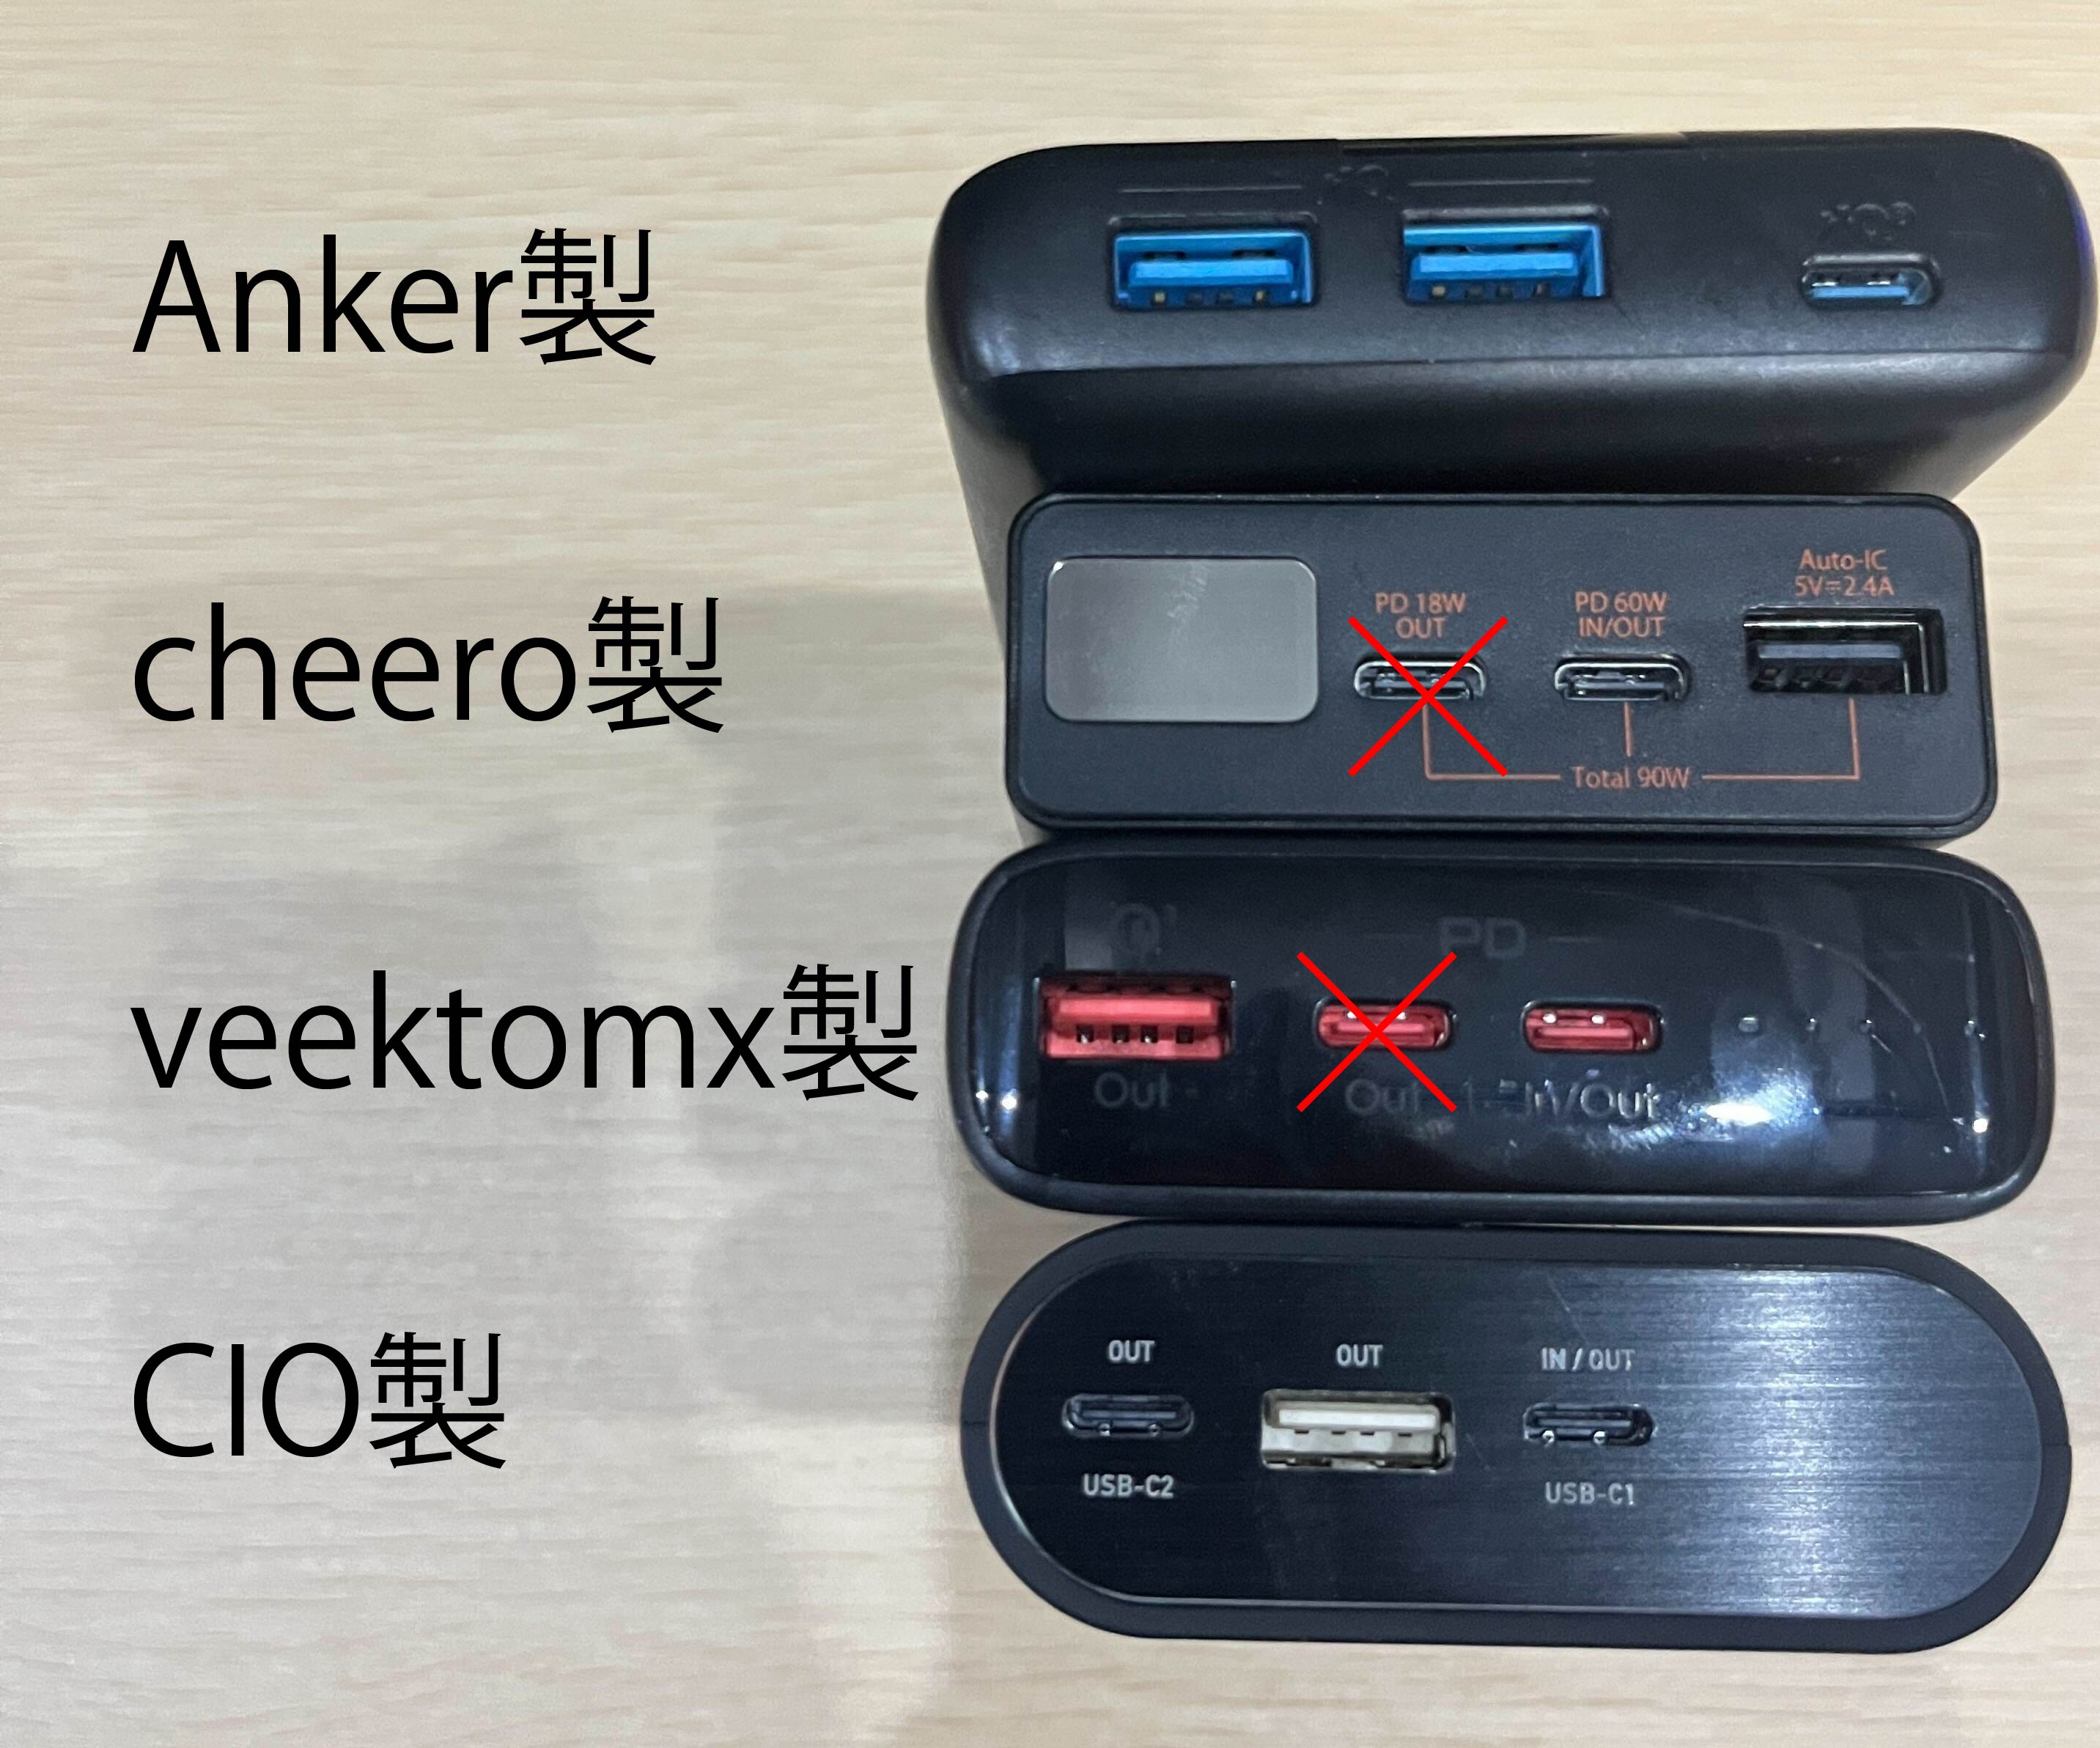
Anker included battery - can be used with either Type A connector.
The included cheero battery - cannot be used with the Type C terminal marked PD18wOUT.
The included veektomx battery cannot be used with the Type C terminal marked -OUT only.
Included battery made by CIO - can be used with either Type-C terminal.
When using spare batteries or other accessories other than those provided by our company, please be aware of the following points.
Type C terminal - The terminal must be capable of outputting PD20V1.5A or more.
Type A terminal must be capable of outputting -5V 2.4A or more.
You will also need a mobile battery that can output approximately 60W simultaneously across all terminals.
1.1. Connection (USB memory)
Connect the USB memory to the LA03.

1.2. Connection (Mobile Battery)
Insert the USB Type-A cable and the Type-C cable into the designated locations on the mobile battery and turn the power switch ON.


1.3. Turning the fan on and off

The fan can be turned on and off using the toggle switch on the top.
Push it up to start the fan and push it down to stop the fan.
1.4. Turn on Wi-Fi reception
Please turn on the Wi-Fi reception on your smartphone. It is okay if you are not connected to other Wi-Fi networks.
2. LA03 operation screen
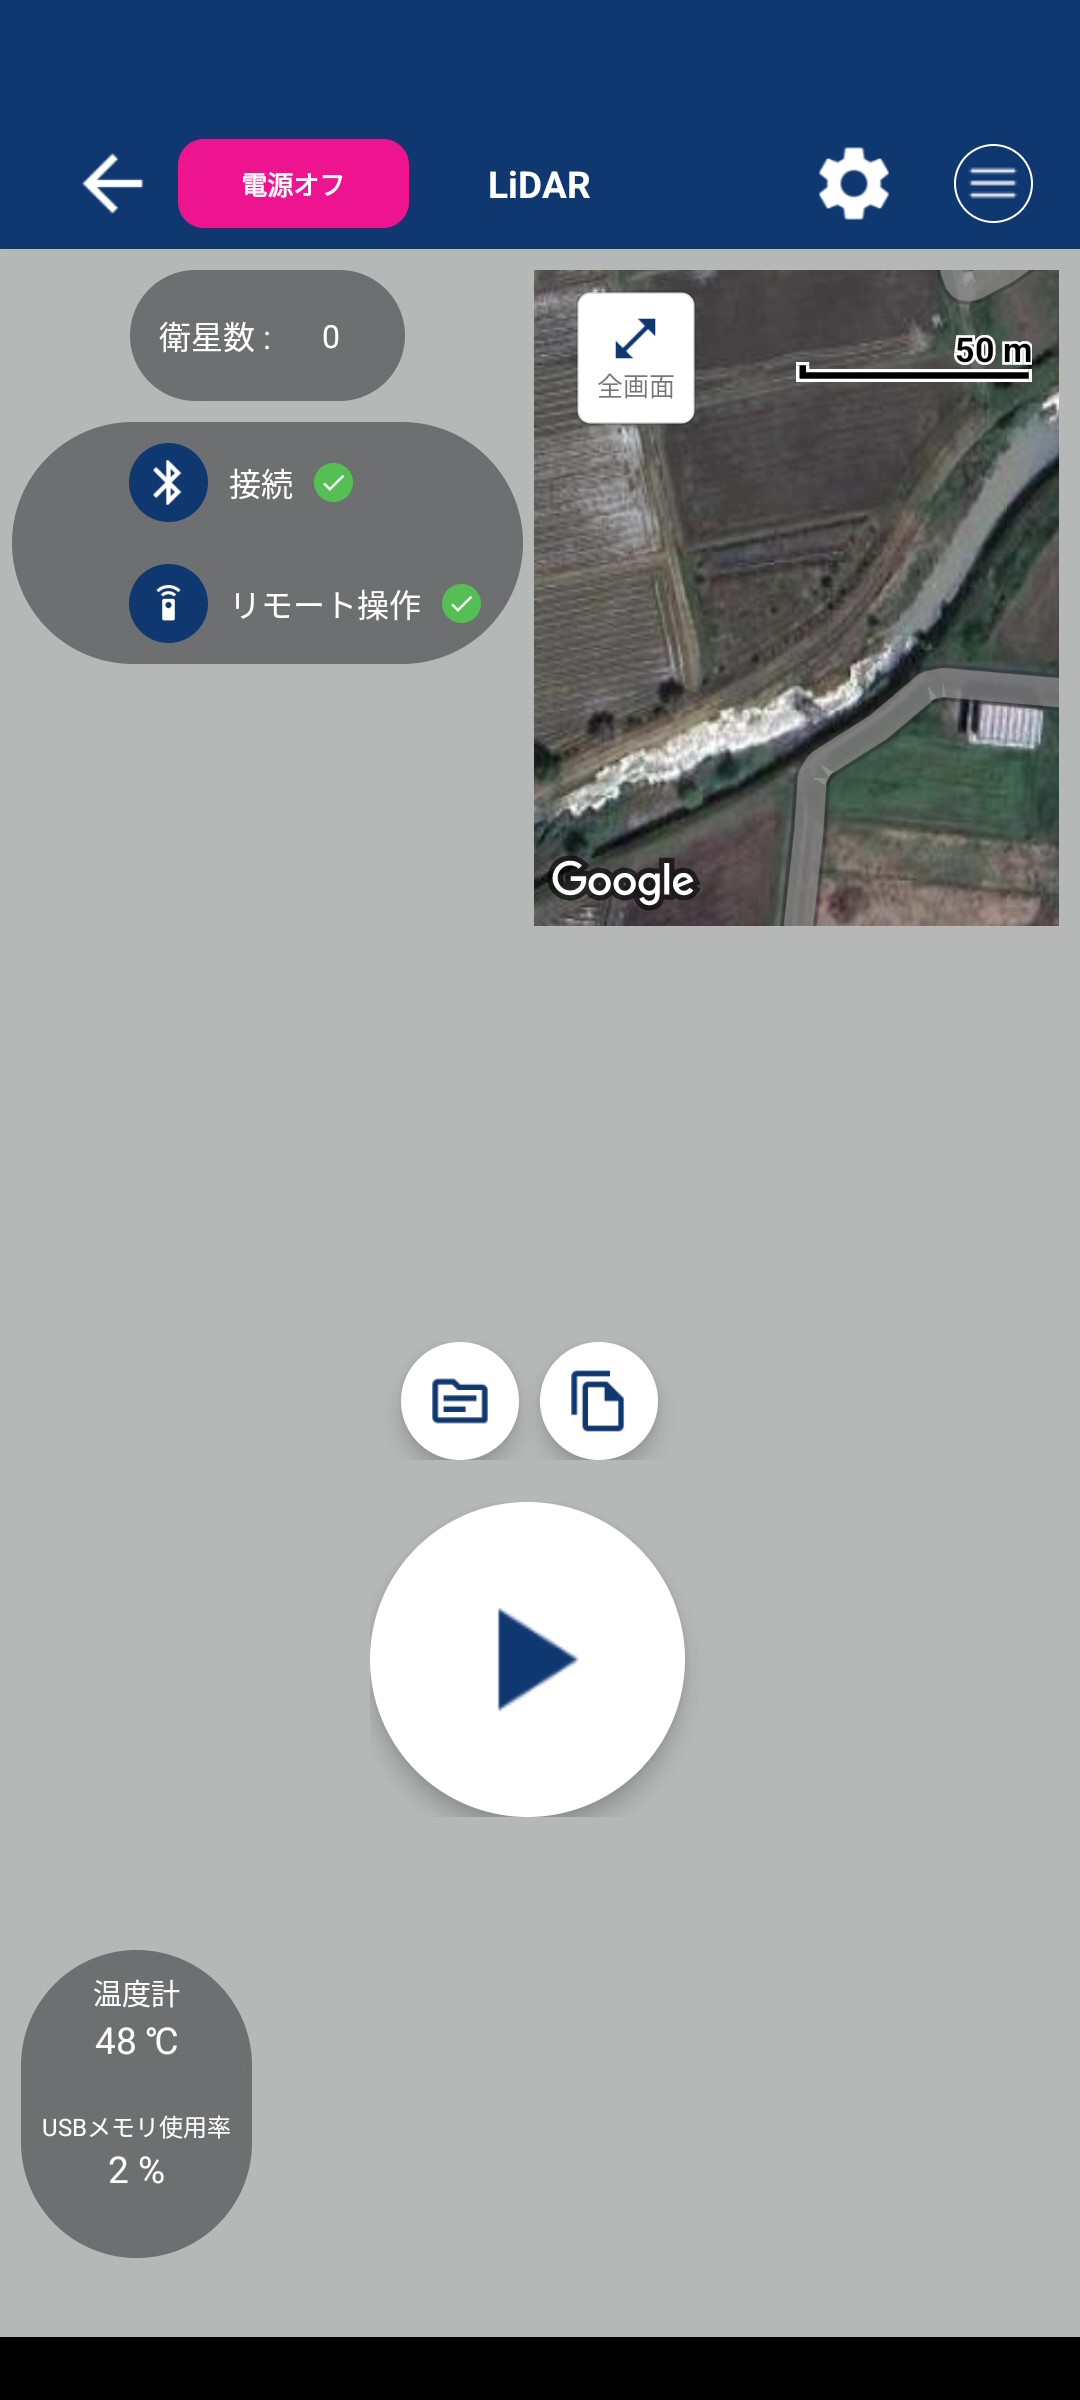
2.1. Screen display

After logging in, tap the LiDAR button to display the LiDAR operation screen.
2.2. Screen details
2.2.1. Scan preparation
Once the scan preparation is complete, the various buttons will be enabled and you will be able to perform the scan operation. (It will take about one to one and a half minutes until the scan preparation is complete.)
If you are using a GNSS receiver, the number of satellites will be displayed. Also, if the communication status with the GNSS receiver is FIX, an icon will be displayed next to the number of satellites.
2.2.2. Routing and Display
2.2.2.1. Directional indication

After pressing the scan button until scanning begins, the direction your smartphone is facing will be displayed as a red icon in the center of the map.
2.2.2.2. Map display and zoom
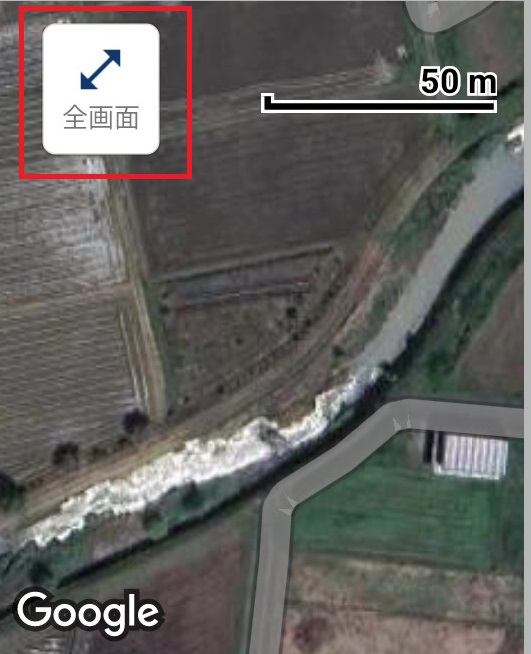
The map screen can be zoomed in and out.
2.2.2.3. Map layers

It will be displayed when the map is in full screen mode and you can change the displayed map.
Google Maps is displayed initially, but it is possible to display Geospatial Information Authority maps, aerial photographs, etc. as base maps.
Maps other than Google Maps can be downloaded from Menu > Map Cache Management and used offline.
Change the map layer, load and display the area you want to download and it will be saved in the cache.
Please download it in an online environment such as an office, and then use it in an offline environment such as in a forest.
2.2.2.4. Select points
The search button will appear when you put the map in full screen mode.
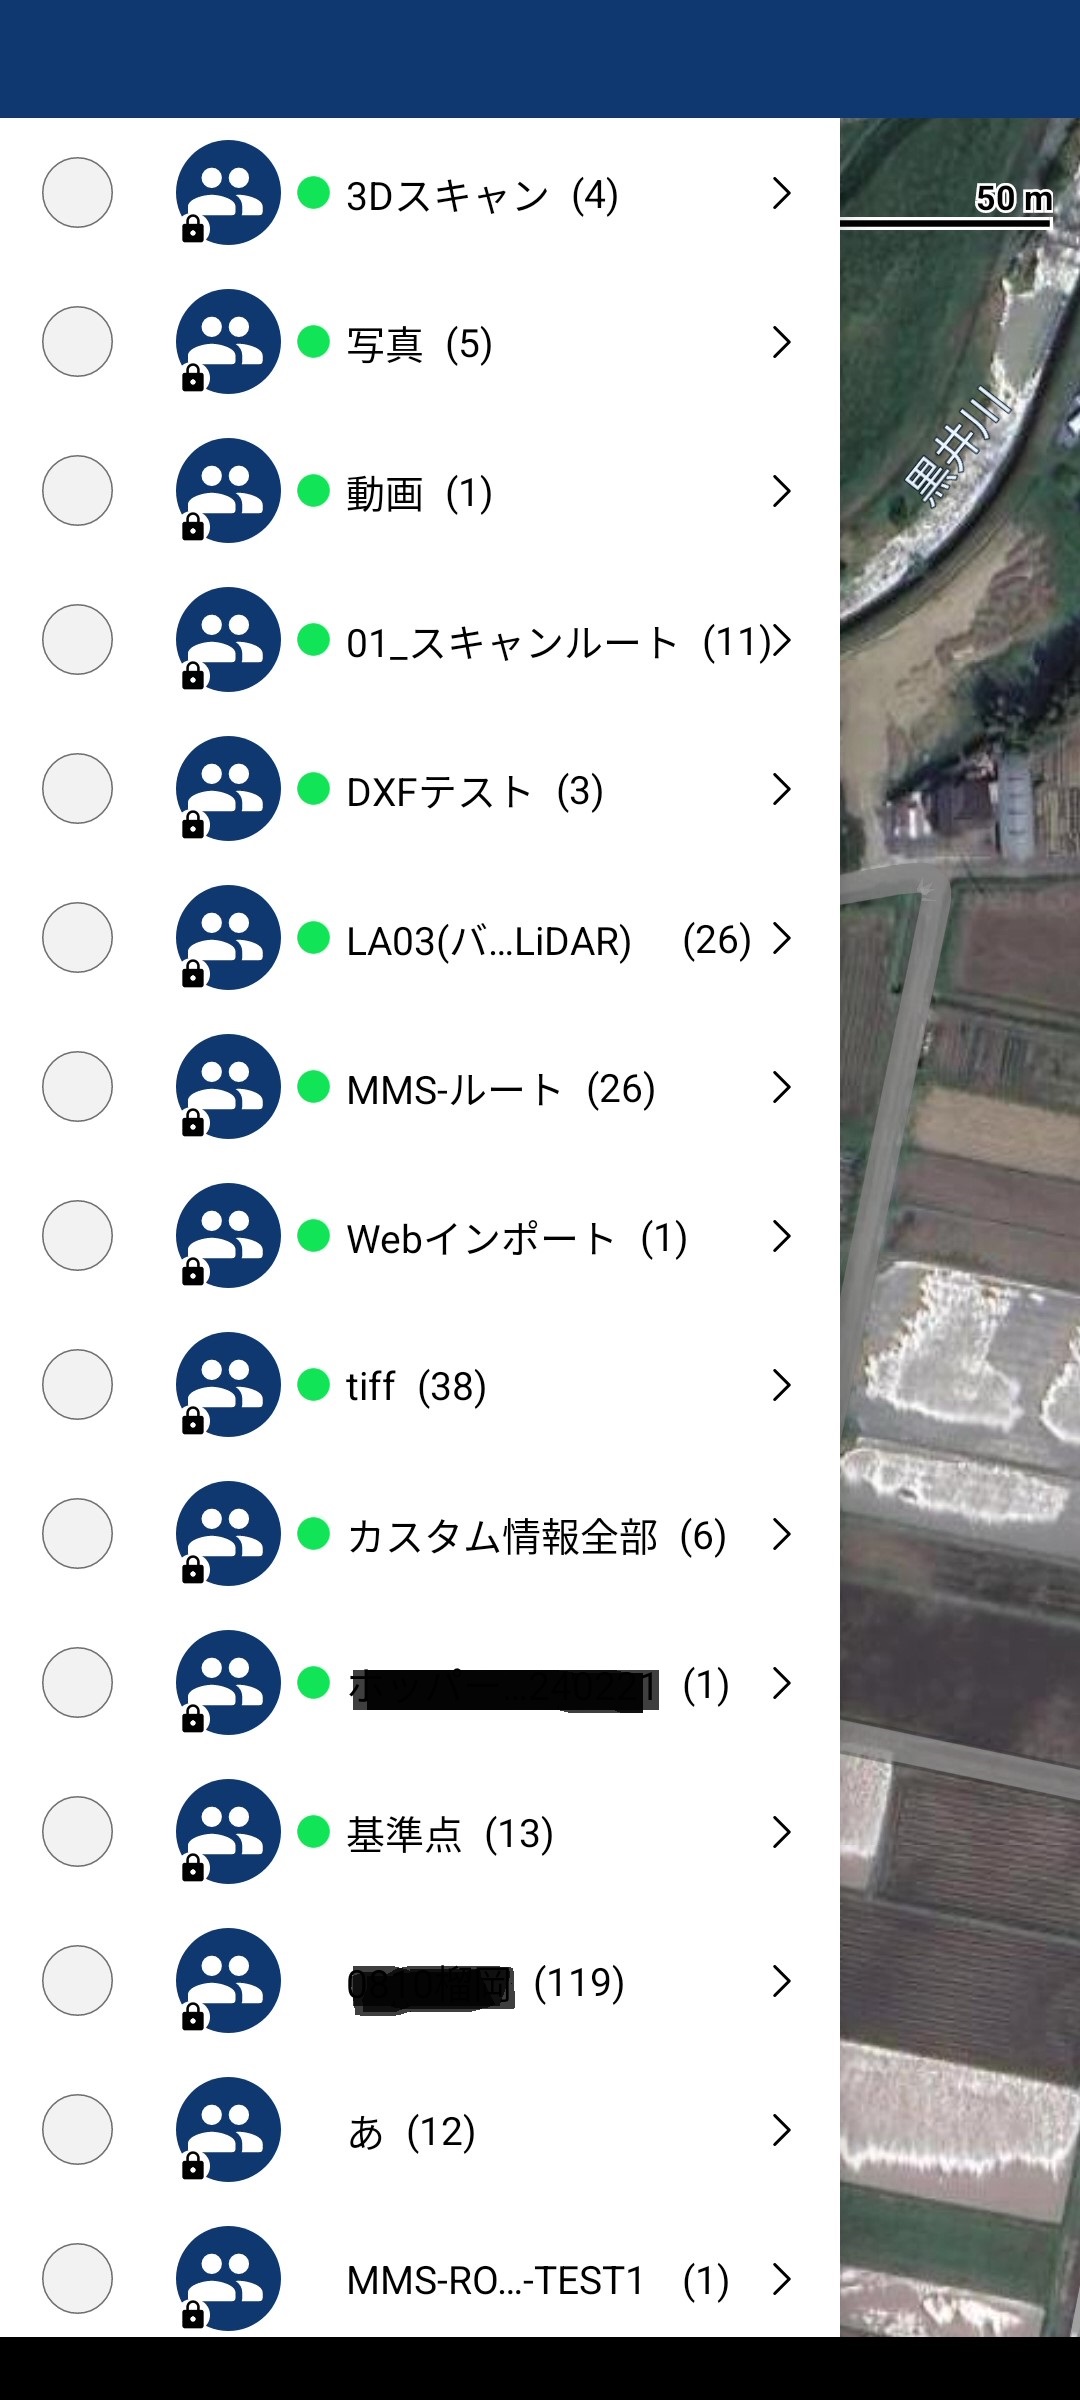
Tap the search button to display and select a list of points.
2.2.2.5. Route creation
Tapping the Create Route button will take you to route creation mode, where you can create a route in two ways: from points or manually.
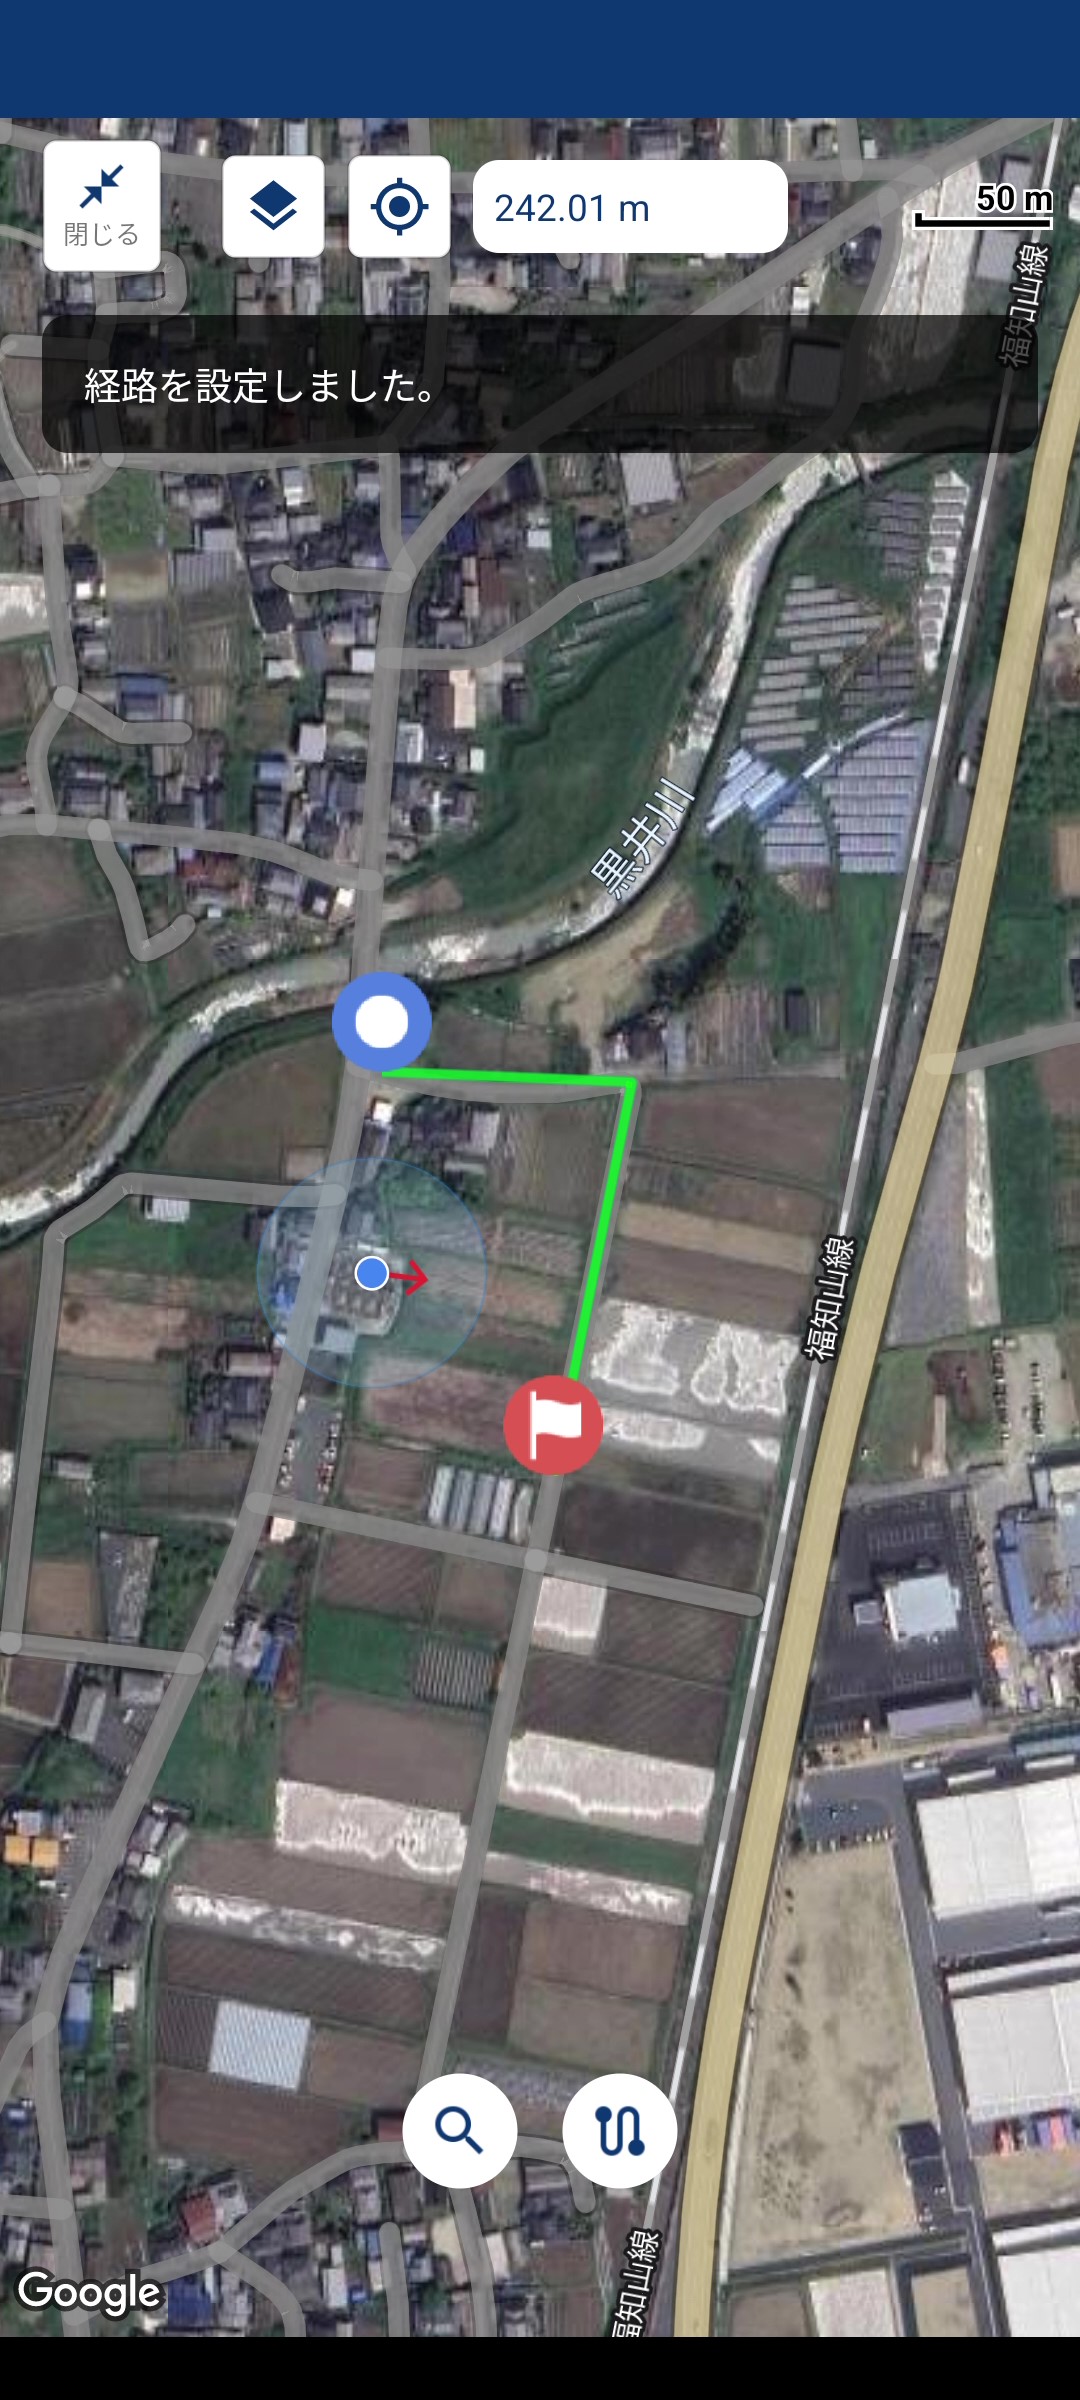
2.2.2.6. Create from points
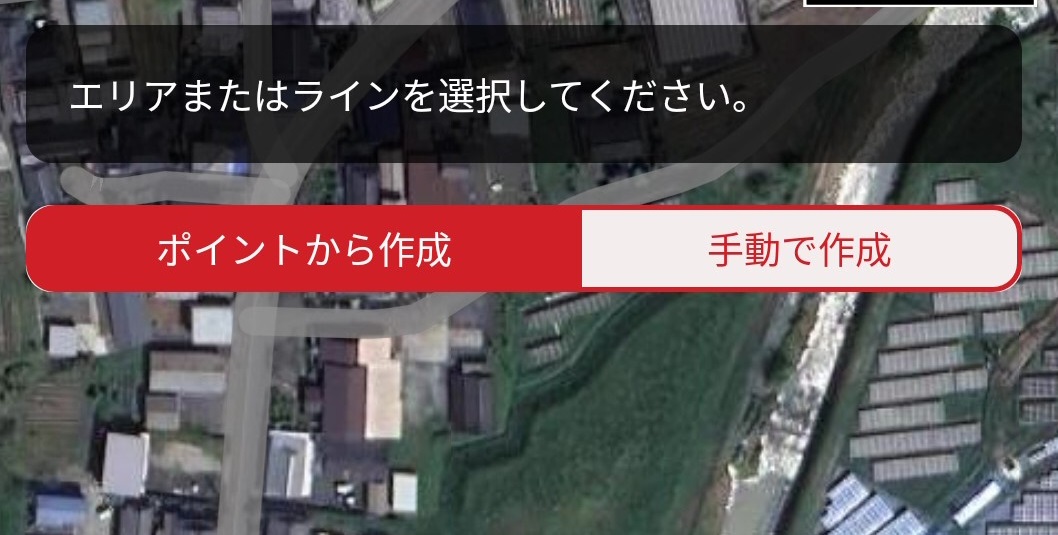
In route creation mode, select the "Create from points" tab and then tap a line or area to create a route.
- Select a line to create a route
- Select any line displayed on the map
- A dialog box will appear asking "Are you sure you want to set the route?" Select "Yes"
- The route is created in yellow-green.
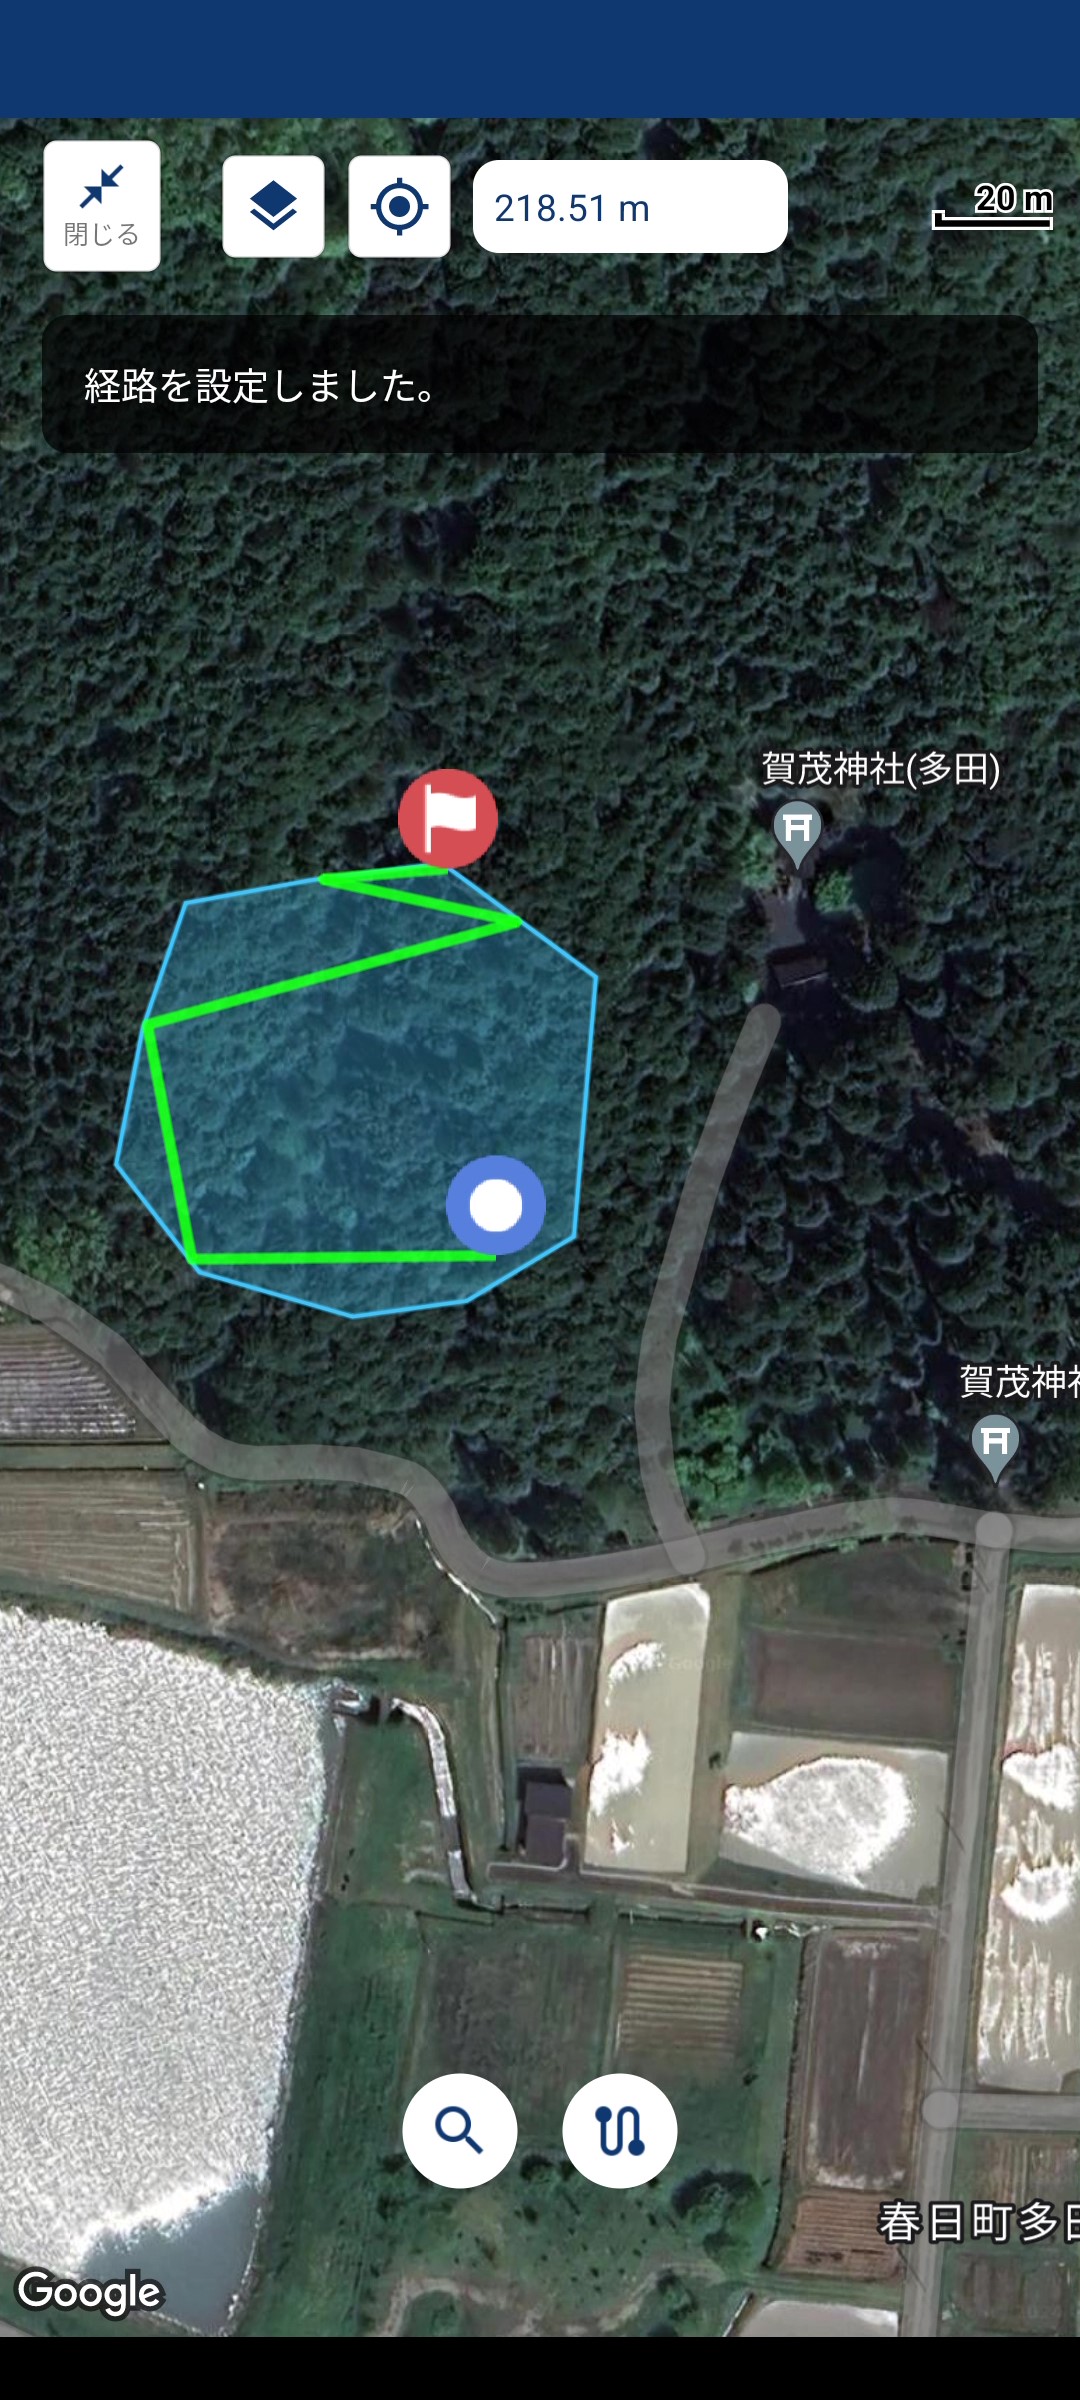
- Select an area and create a route
- Select any area displayed on the map
- Tap inside the area that turns yellow-green
- Set the tap position as the starting point and create a route automatically
- *For areas where tiff files are registered, the tiff files will not be drawn on the map and will not be recognized as areas.
Button Description
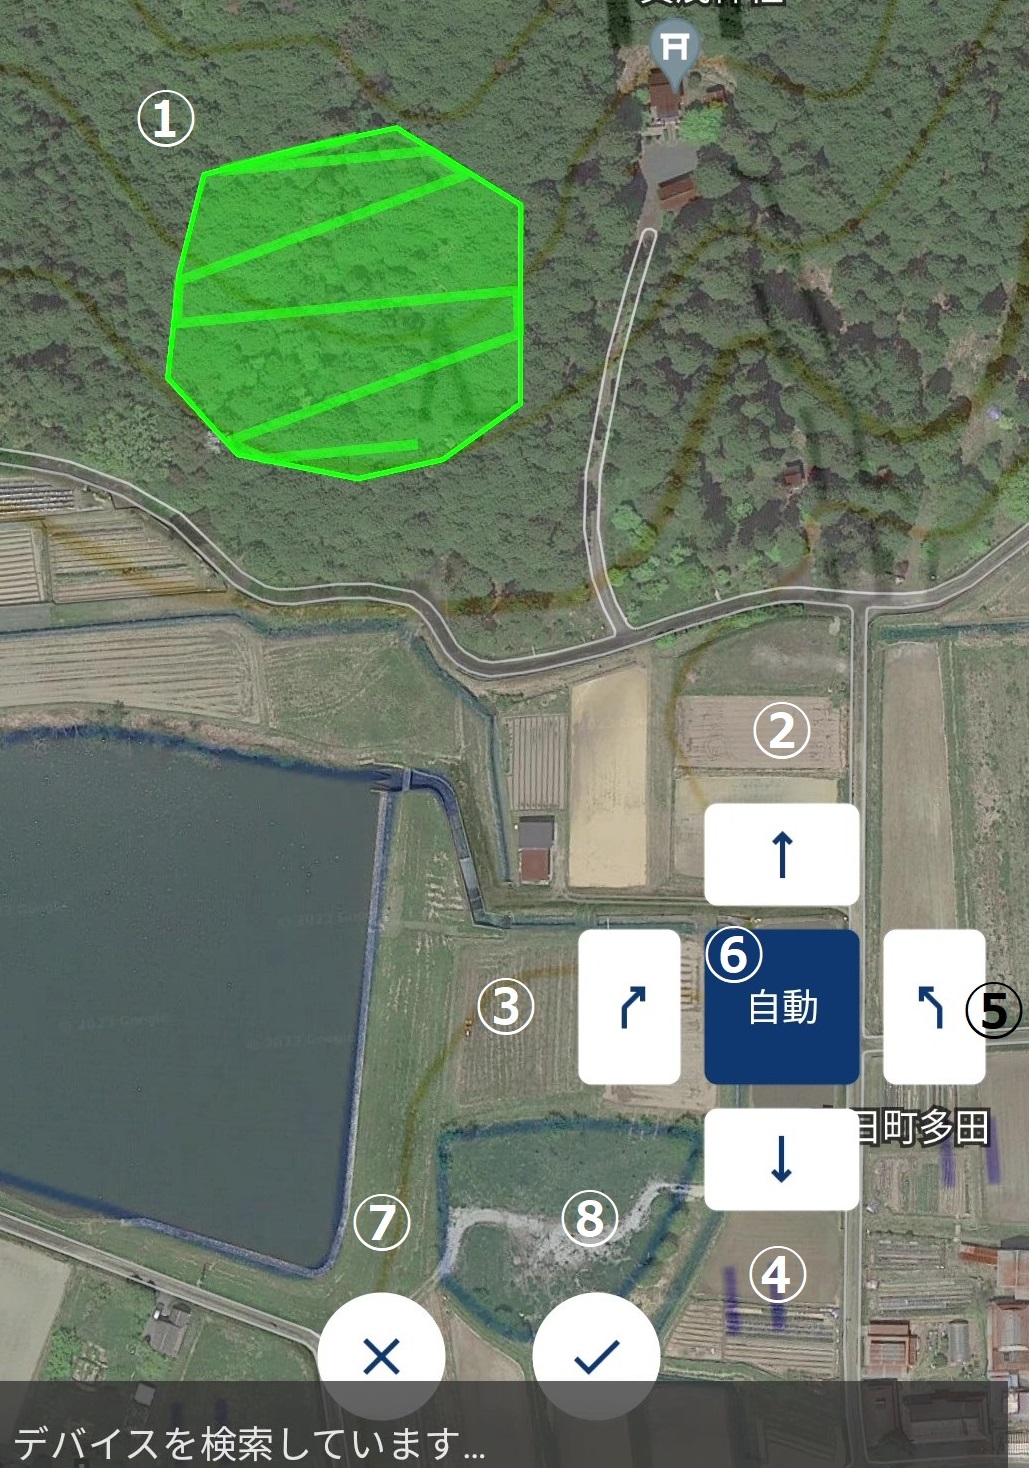
① You can automatically create a route by tapping within the area. The point you tapped will be set as the starting point.
② Route repetition can be reduced.
③ The route can be rotated to the right.
④ Route repetition can be increased.
⑤ The route can be rotated to the left.
⑥ You can switch between a mode that allows automatic route creation and a mode that allows manual route creation.
⑦ Finish creating the route.
⑧ Confirm the route.
Manual Creation
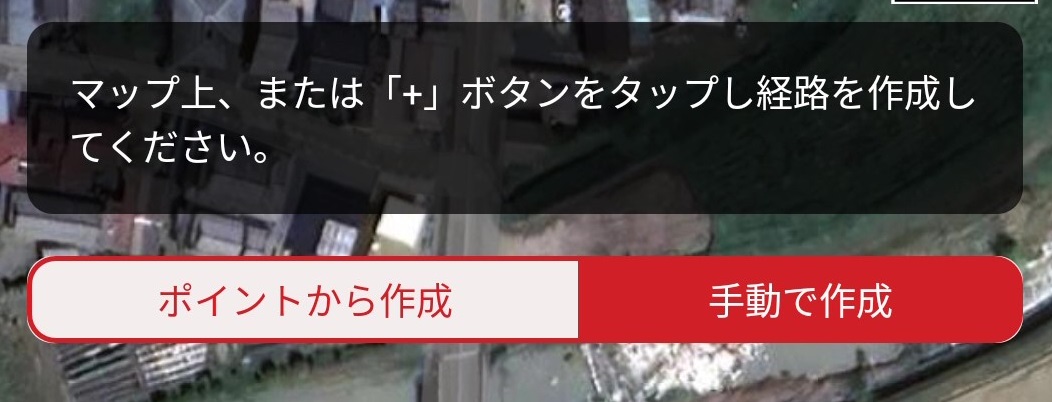
After selecting the "Create Manually" tab in route creation mode, you can create any route by tapping on the map or tapping the "+" button.
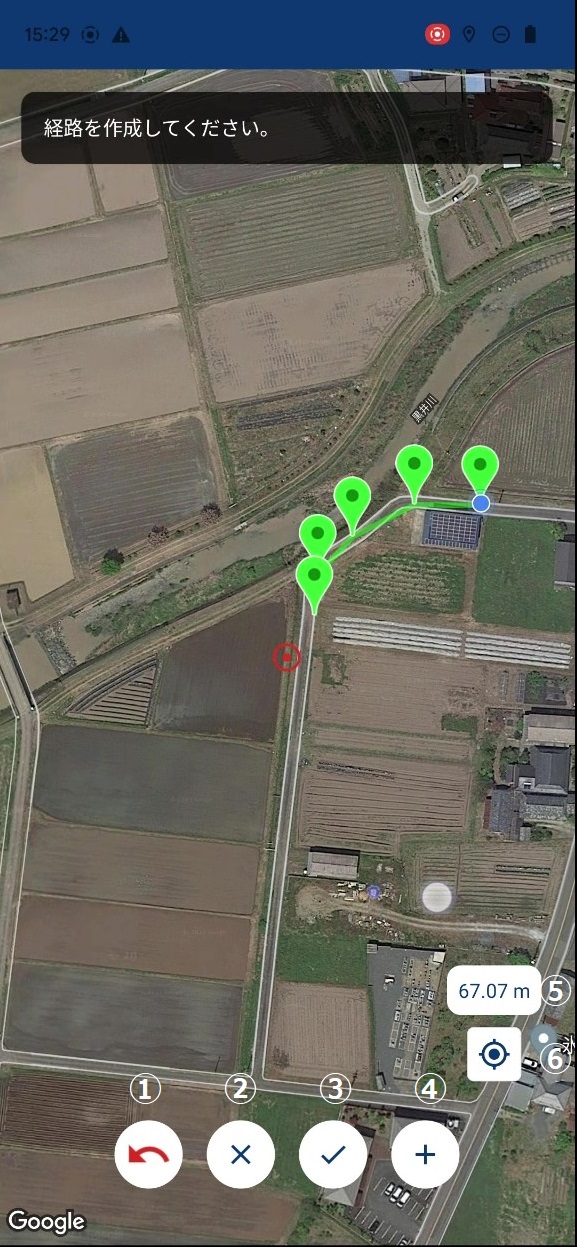
① Delete the route you just added.
② Finish creating the route.
Confirm the route.
④ Add a stopover point.
⑤ Displays the distance of the route.
⑥ Move the center of the screen to your position.
2.2.3. Settings screen
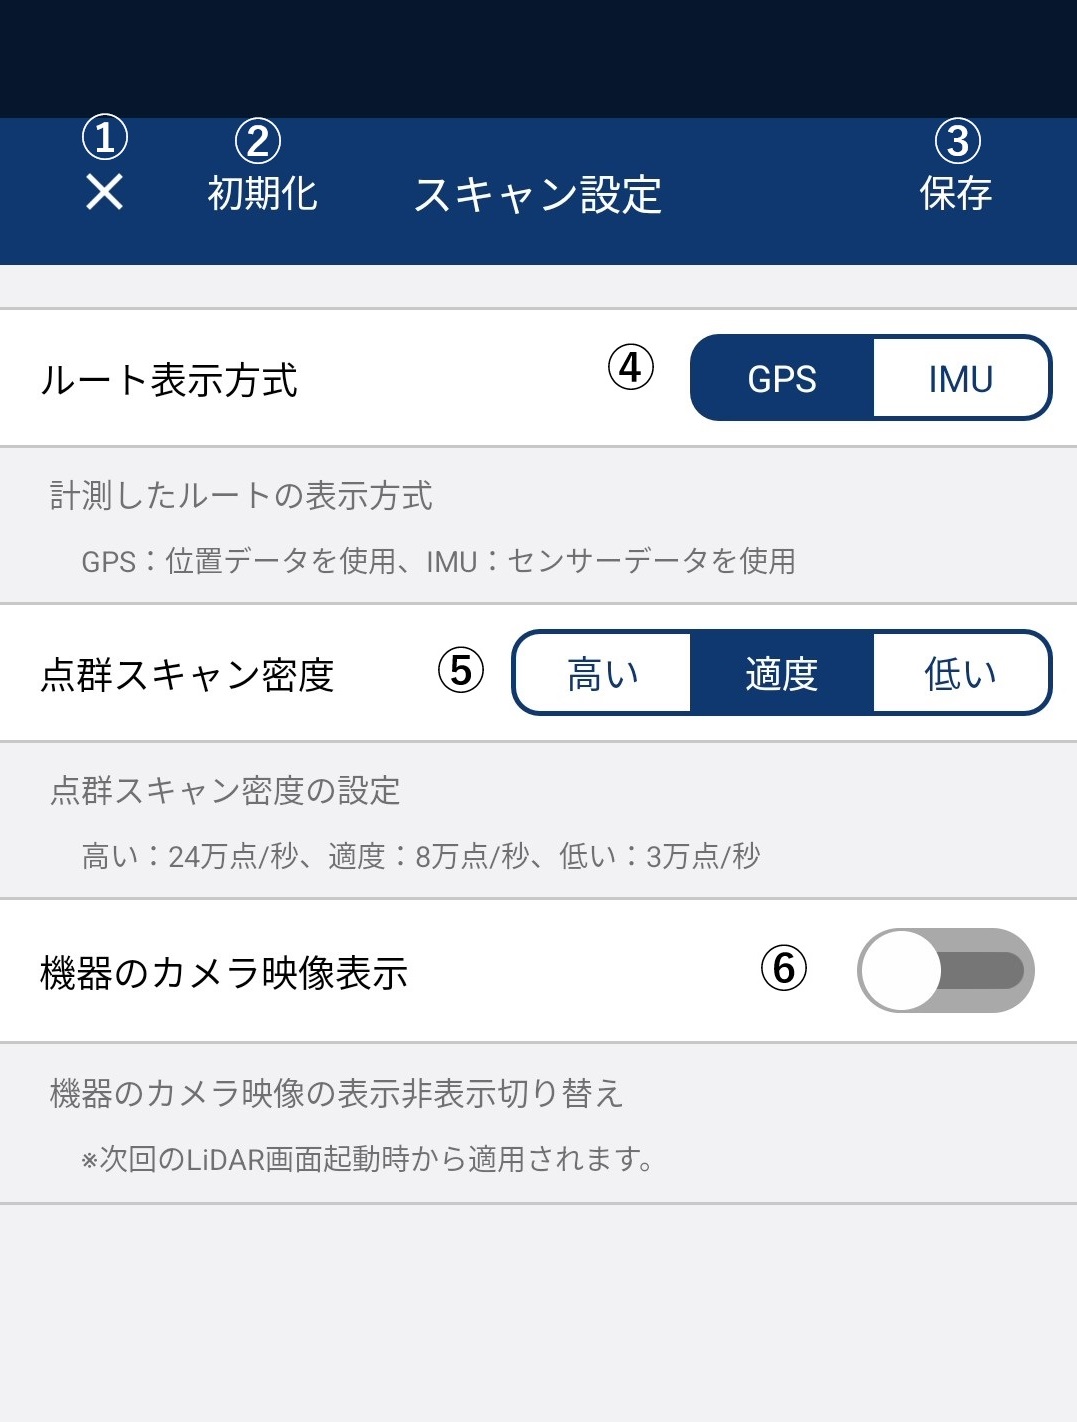
① Close the screen without changing the settings.
② Initialize the settings.
③ Save your changes.
④ Route display method You can choose from two route display methods when measuring.
- GPS
- The measured route is displayed using the smartphone's GPS or the mapry R1's location information.
- IMU
- Displays the measured route using the device's IMU.
IMU is recommended in forests.
- Displays the measured route using the device's IMU.
⑤ You can set the point cloud scan density.
- High: 240,000 points/sec
- Moderate: 80,000 points/sec
- Low: 30,000 points/sec
Moderate point cloud scan density is recommended.
⑥ You can change the settings for transferring video from the LA03 camera to your smartphone.
We recommend setting the camera footage to OFF as it takes time to prepare.
2.2.4. Scan Settings
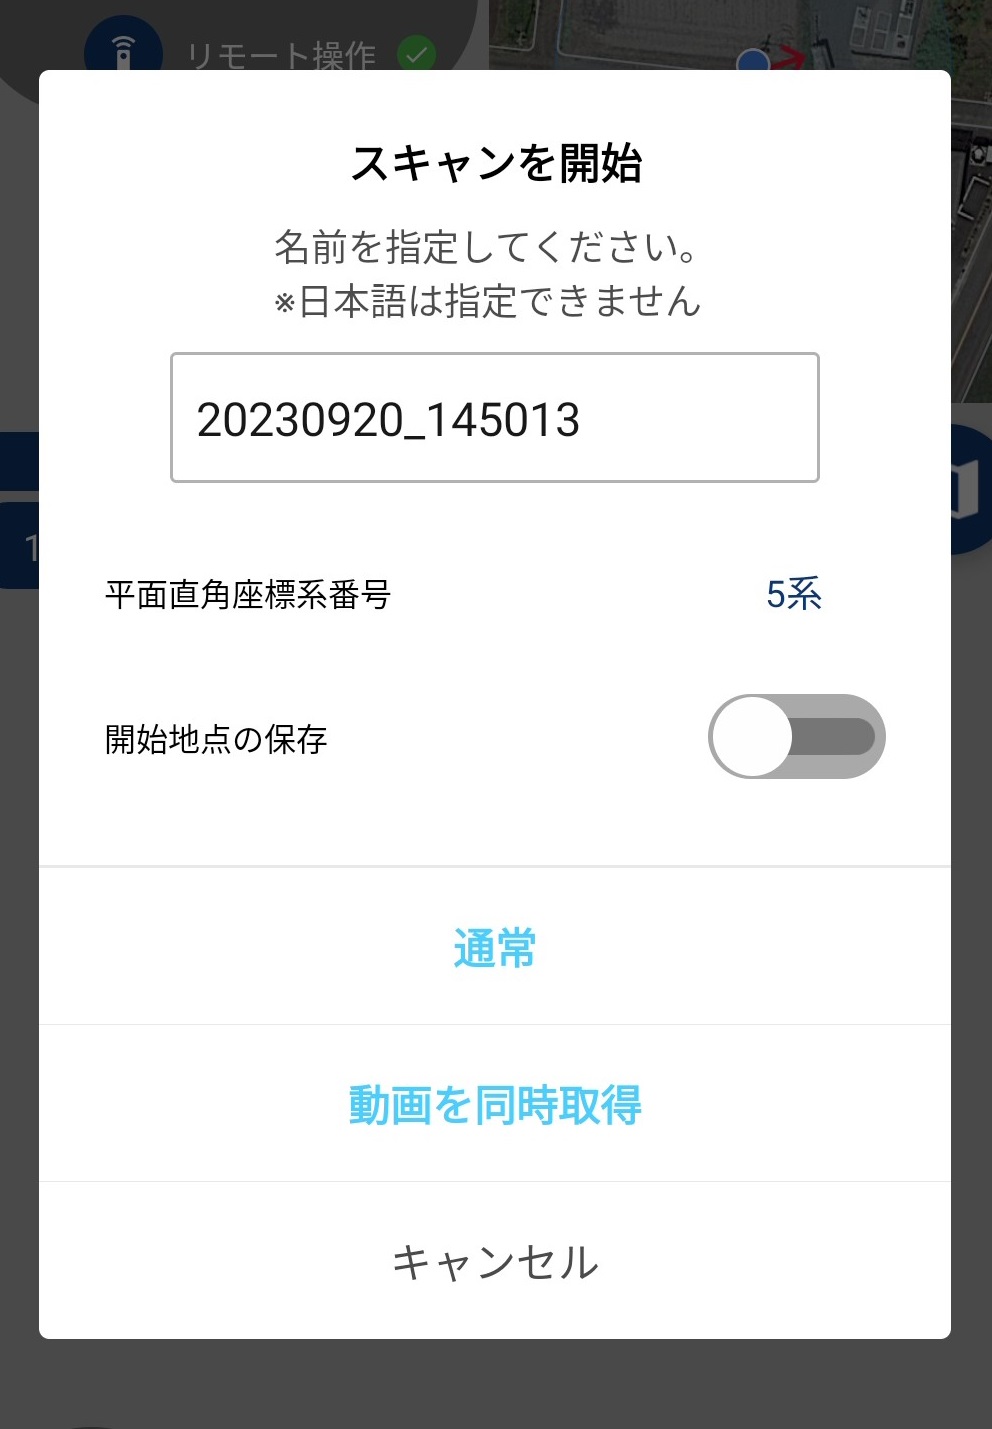
Tap the Start Scan button to choose between two scan modes and set options.
- Scan Mode
- usually
- You can create 3D maps on the go.
- Simultaneous video capture
- It creates a 3D map as it moves and simultaneously captures video.
- usually
- option
- File name
- Changes are optional. Japanese cannot be used.
- Plane Cartesian Coordinate System Number
- Selection is required. Please select the coordinate system number.
- Save starting point
-
This is optional. Select this if you want to save the scan start point and scan route to a point.
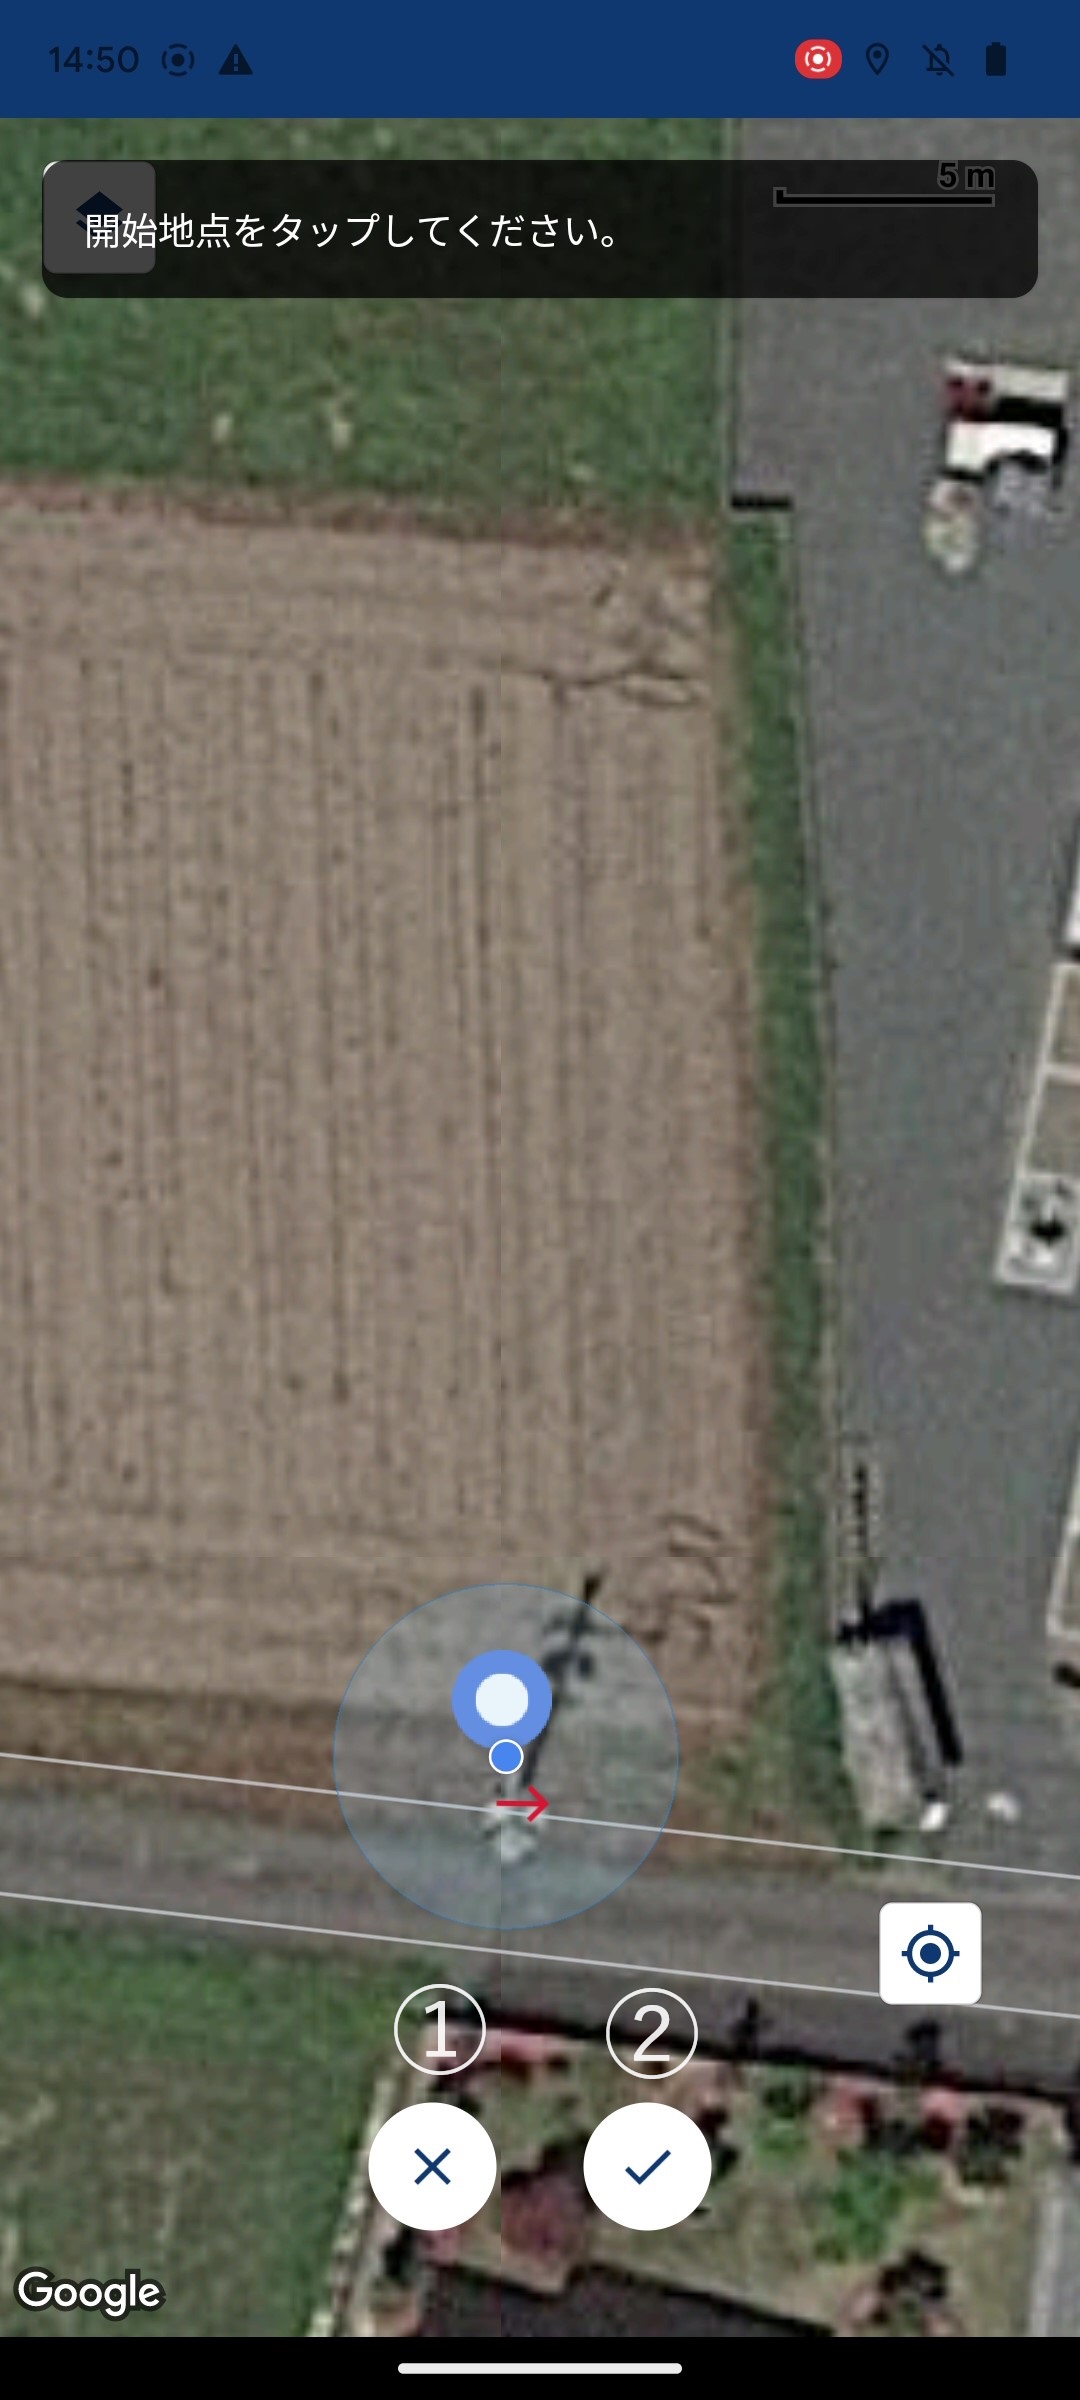
Selecting the switch will bring up a map, with the blue and white circle icon being your starting point.
Tap the map to place the icon at the desired location, then use buttons ① and ② to confirm or cancel.
① Cancel button
- Cancels the start position selection.
② Confirm button
- Determine the starting position.
*The starting point and route points are automatically saved when the main map screen is displayed in an online environment.
Destination group name: "LA03 (backpack LiDAR)" -
- File name
2.2.5. Start Scan
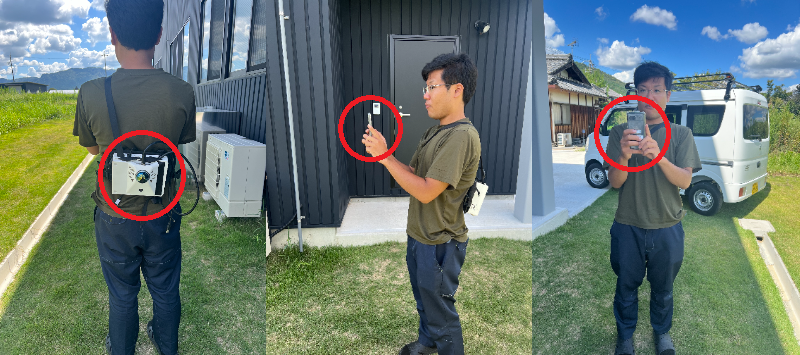
When starting measurement, make sure the LA03 and smartphone are in a straight line.
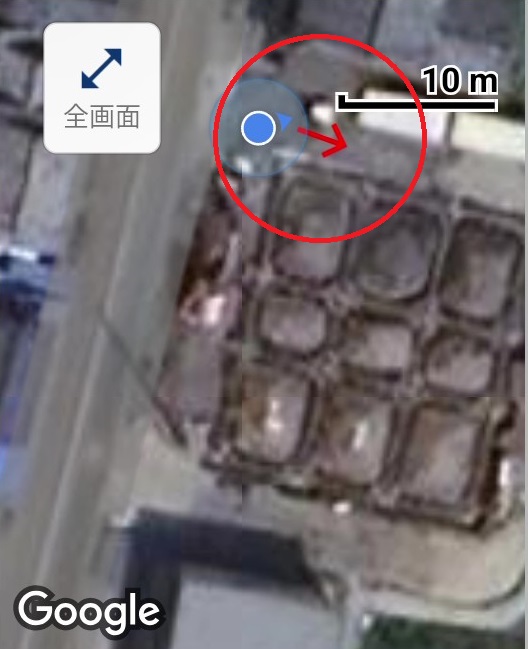
Also, when displaying the route measured by the IMU, adjust the position of your smartphone so that the red arrow on the map points in the direction of travel.
-
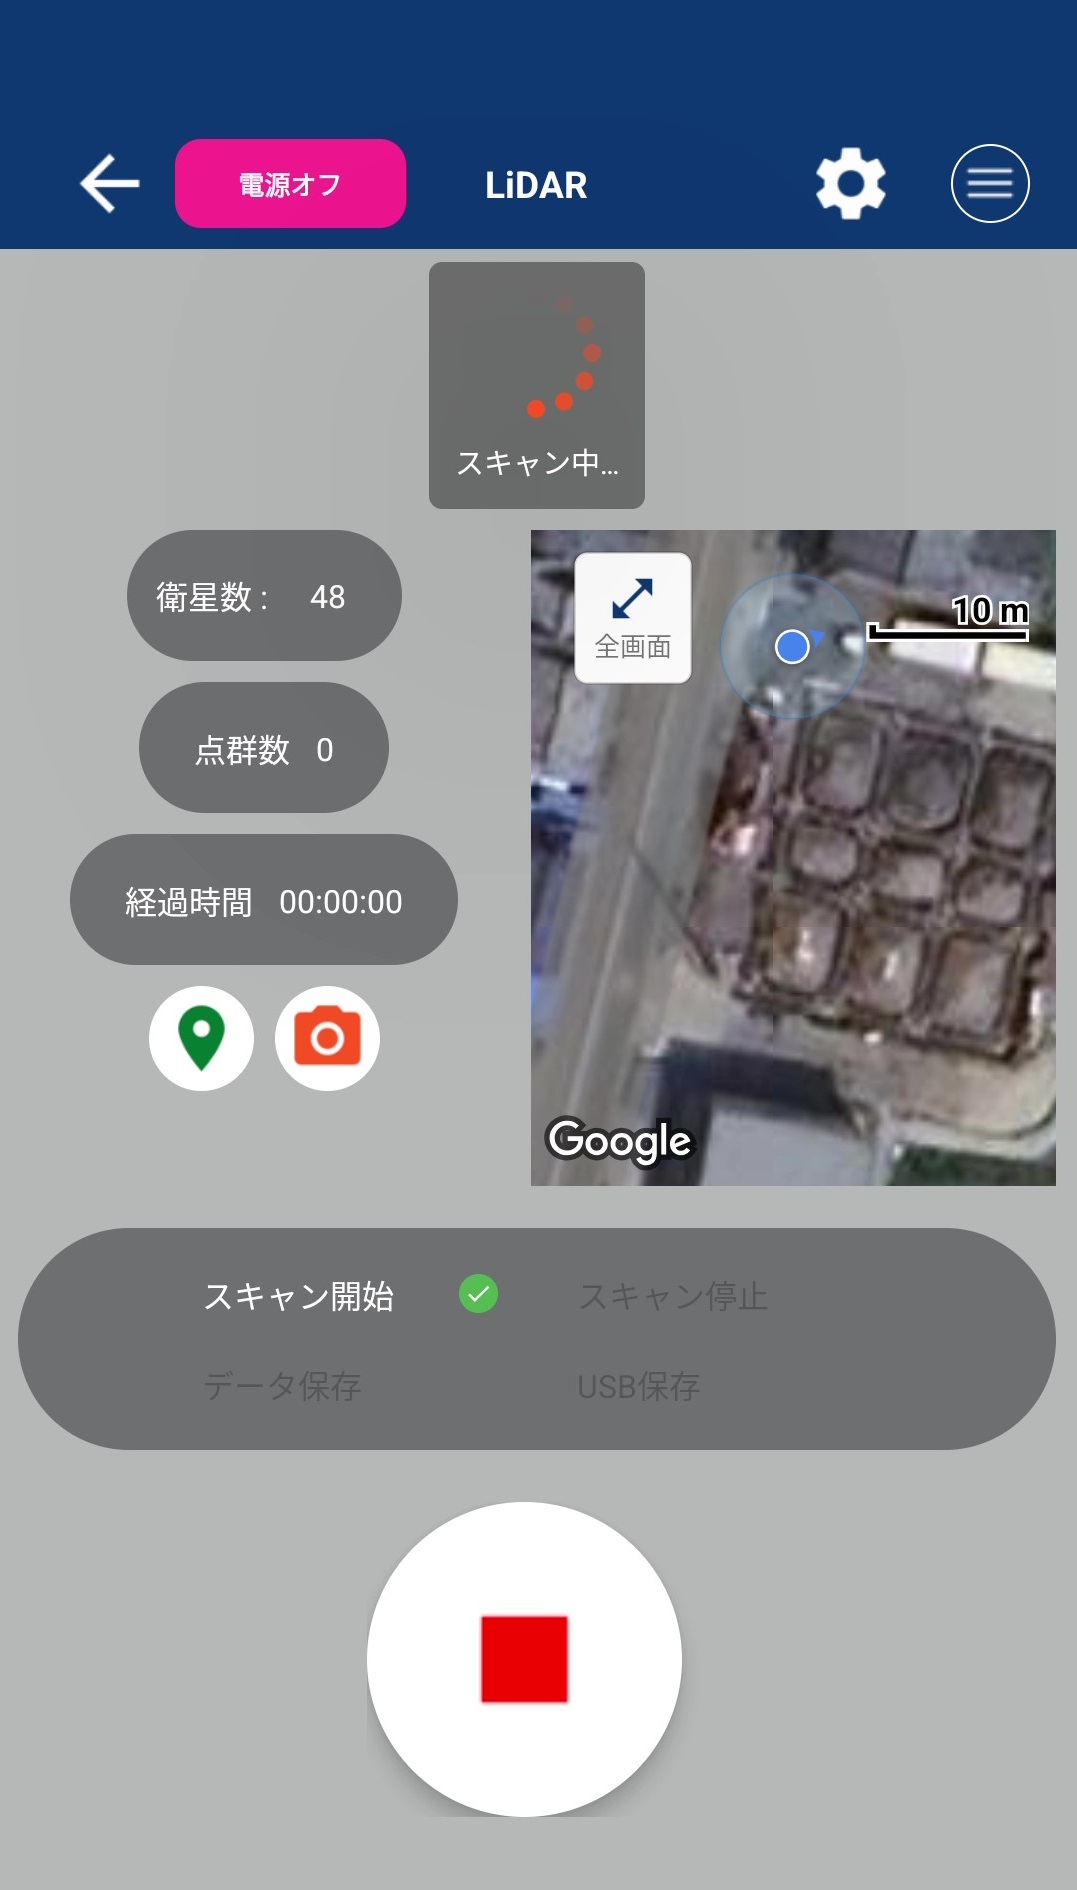
If measurement starts normally
"Scanning" will be displayed in the center of the screen. Once "Scanning" is displayed, point cloud acquisition will begin.
-
If a problem occurs during measurement
An error dialog will appear stating "A problem has occurred" and the scan will automatically stop.
Please note that this may occur when scanning at close range (up to 2m) or in places with extremely few distinctive features.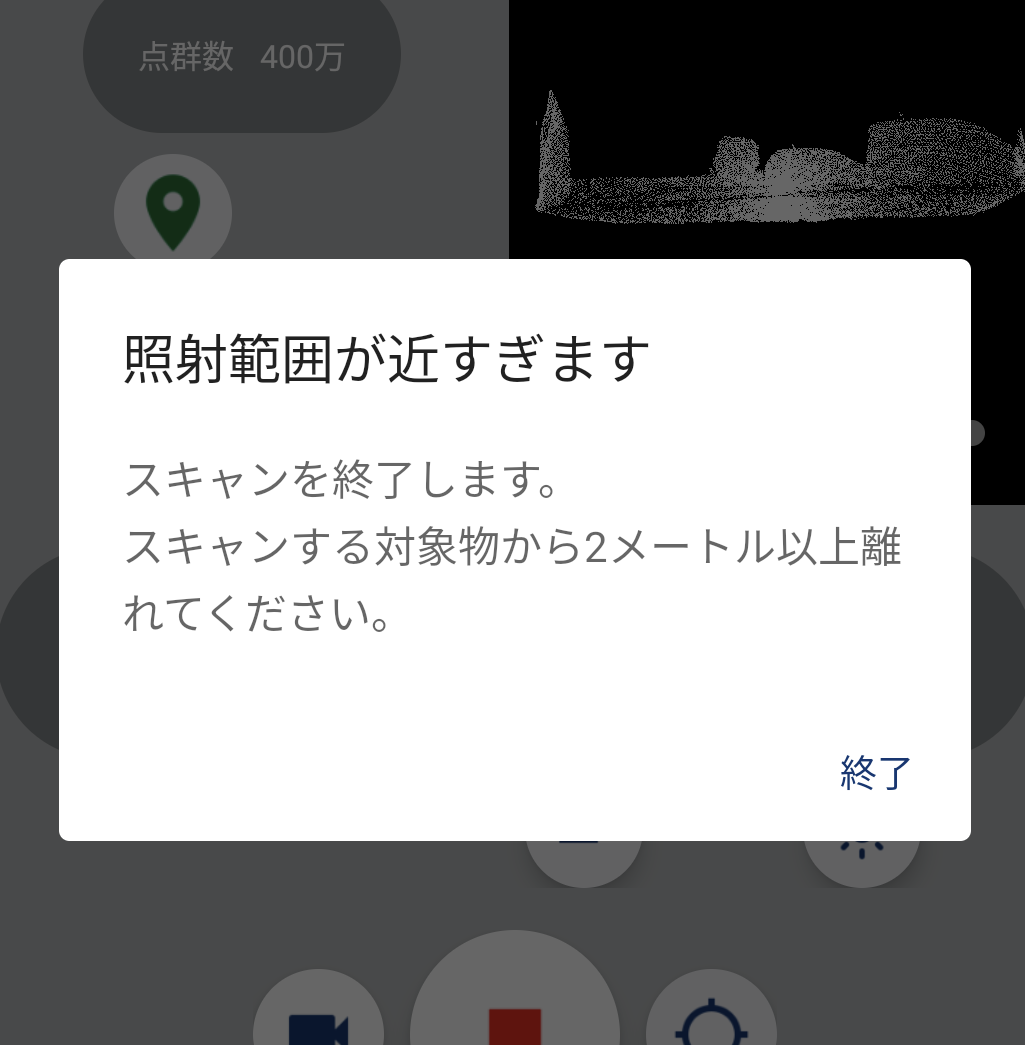
-
If a problem occurs when starting a measurement
The following dialog appears.
-
If the temperature of the LA03 body exceeds 70°C, you can start scanning by pressing "Yes".
However, please note that the device may suddenly stop working if the temperature exceeds 80°C.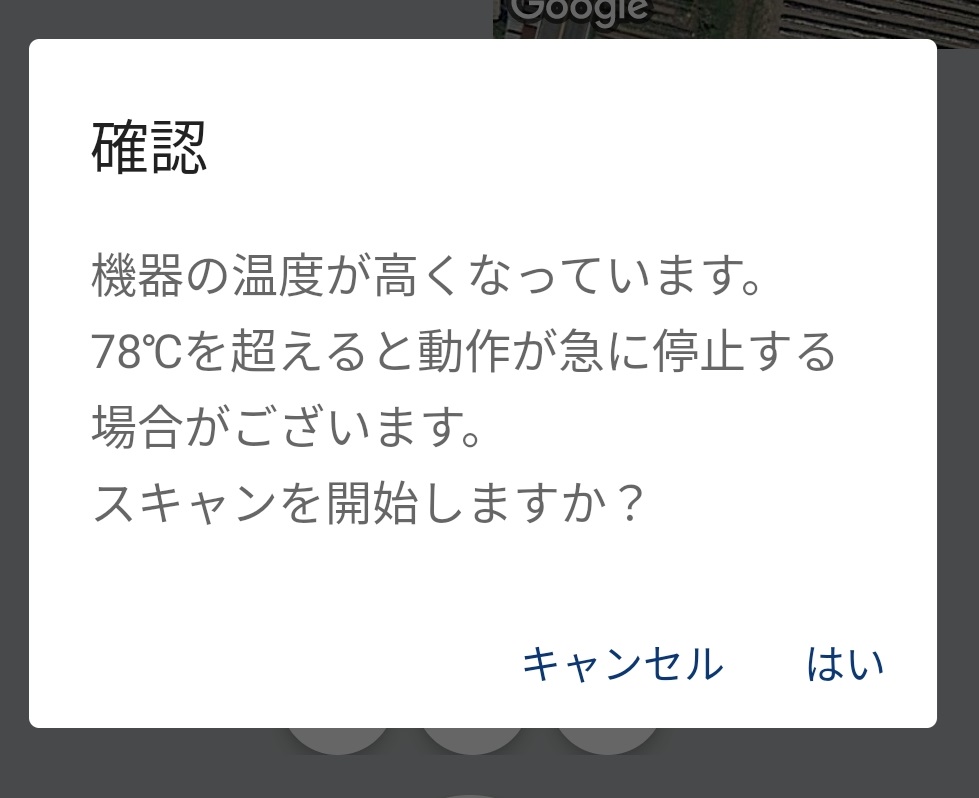
-
When the capacity of the USB memory exceeds 95%
Please organize the contents of the USB memory.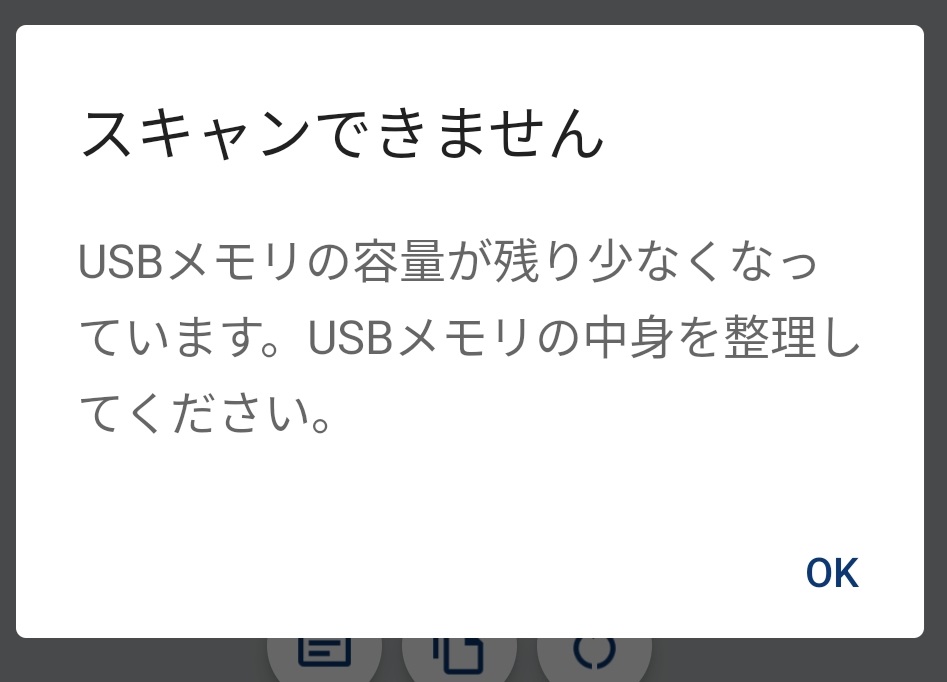
-
2.2.6. Autosave
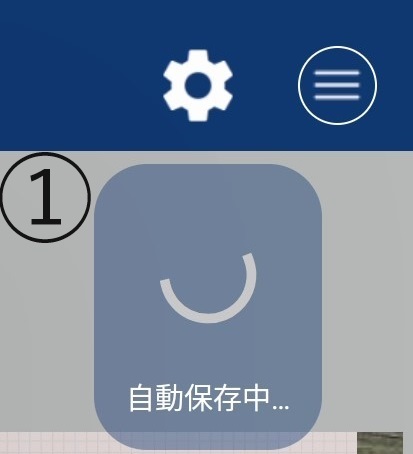
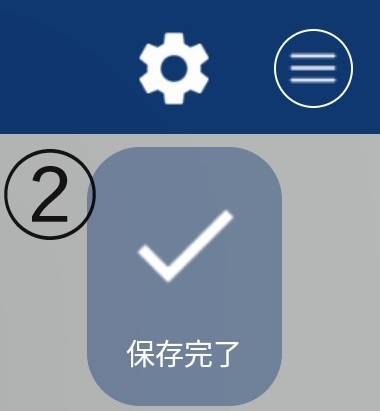
Once scanning begins, scan data (point cloud, video, markers, coordinates, and self-position) will be automatically saved once per minute.
When ① and ② are displayed, auto-save is complete.
Also, the application may freeze during the scan.
If the screen freezes, please end the app task, restart the app, and then display the LiDAR screen.
Once you hear the message "Scanning," you can continue scanning.
2.2.7. Automatic marker placement

Only one point (the starting point) is automatically obtained as a marker.
You can then convert the point cloud to public coordinates by manually placing markers.
In addition, the location information used to acquire markers is the value from a smartphone or GNSS receiver.
If a GNSS receiver is connected, the position information from the GNSS receiver will be used preferentially.
2.2.8. Marker placement

There are two types of markers that can be used during scanning:
- Green Marker
- Obtain the location and image of LA03.
If the GNSS receiver is connected, it will obtain coordinates at the same time.
- Obtain the location and image of LA03.
- Photo marker
- Tap the orange icon and then tap the "+" button to launch the camera.
After launching the camera, take a photo and tap the ✓ button.
The acquired markers will be automatically linked to the GIS as points with photos.
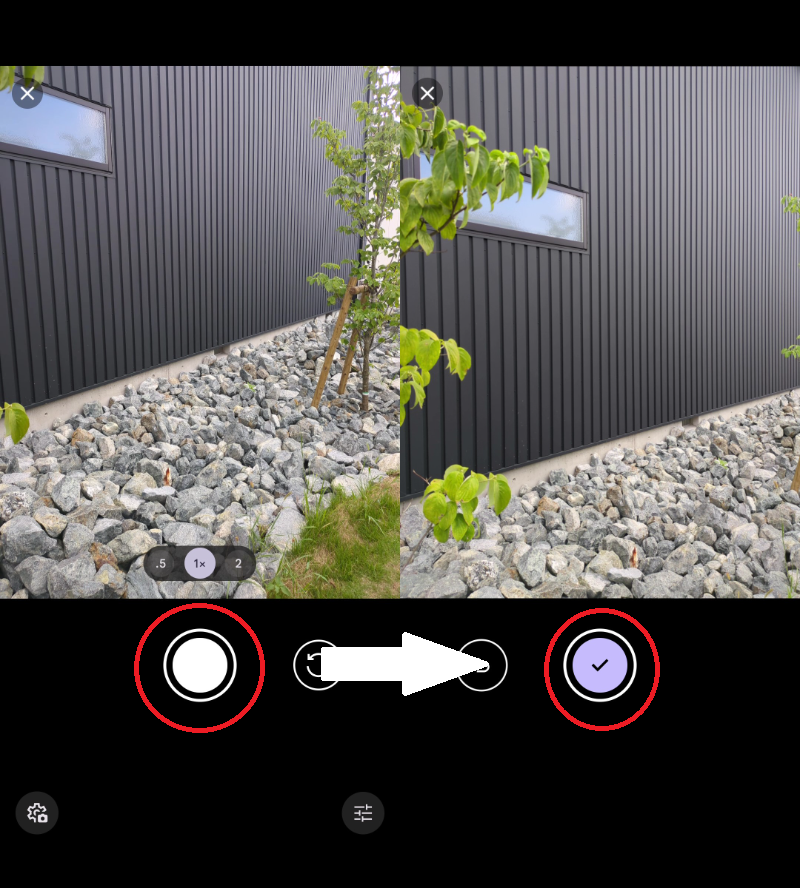
- Tap the orange icon and then tap the "+" button to launch the camera.
2.2.9. Stop Scanning
Tap the stop scan button in the center of the screen.
The following dialog will appear, so tap the "OK" button.

2.2.10. USB Storage
- A message will be displayed while the data is being saved to the USB memory.
The time it takes to save the data varies depending on the number of points scanned.
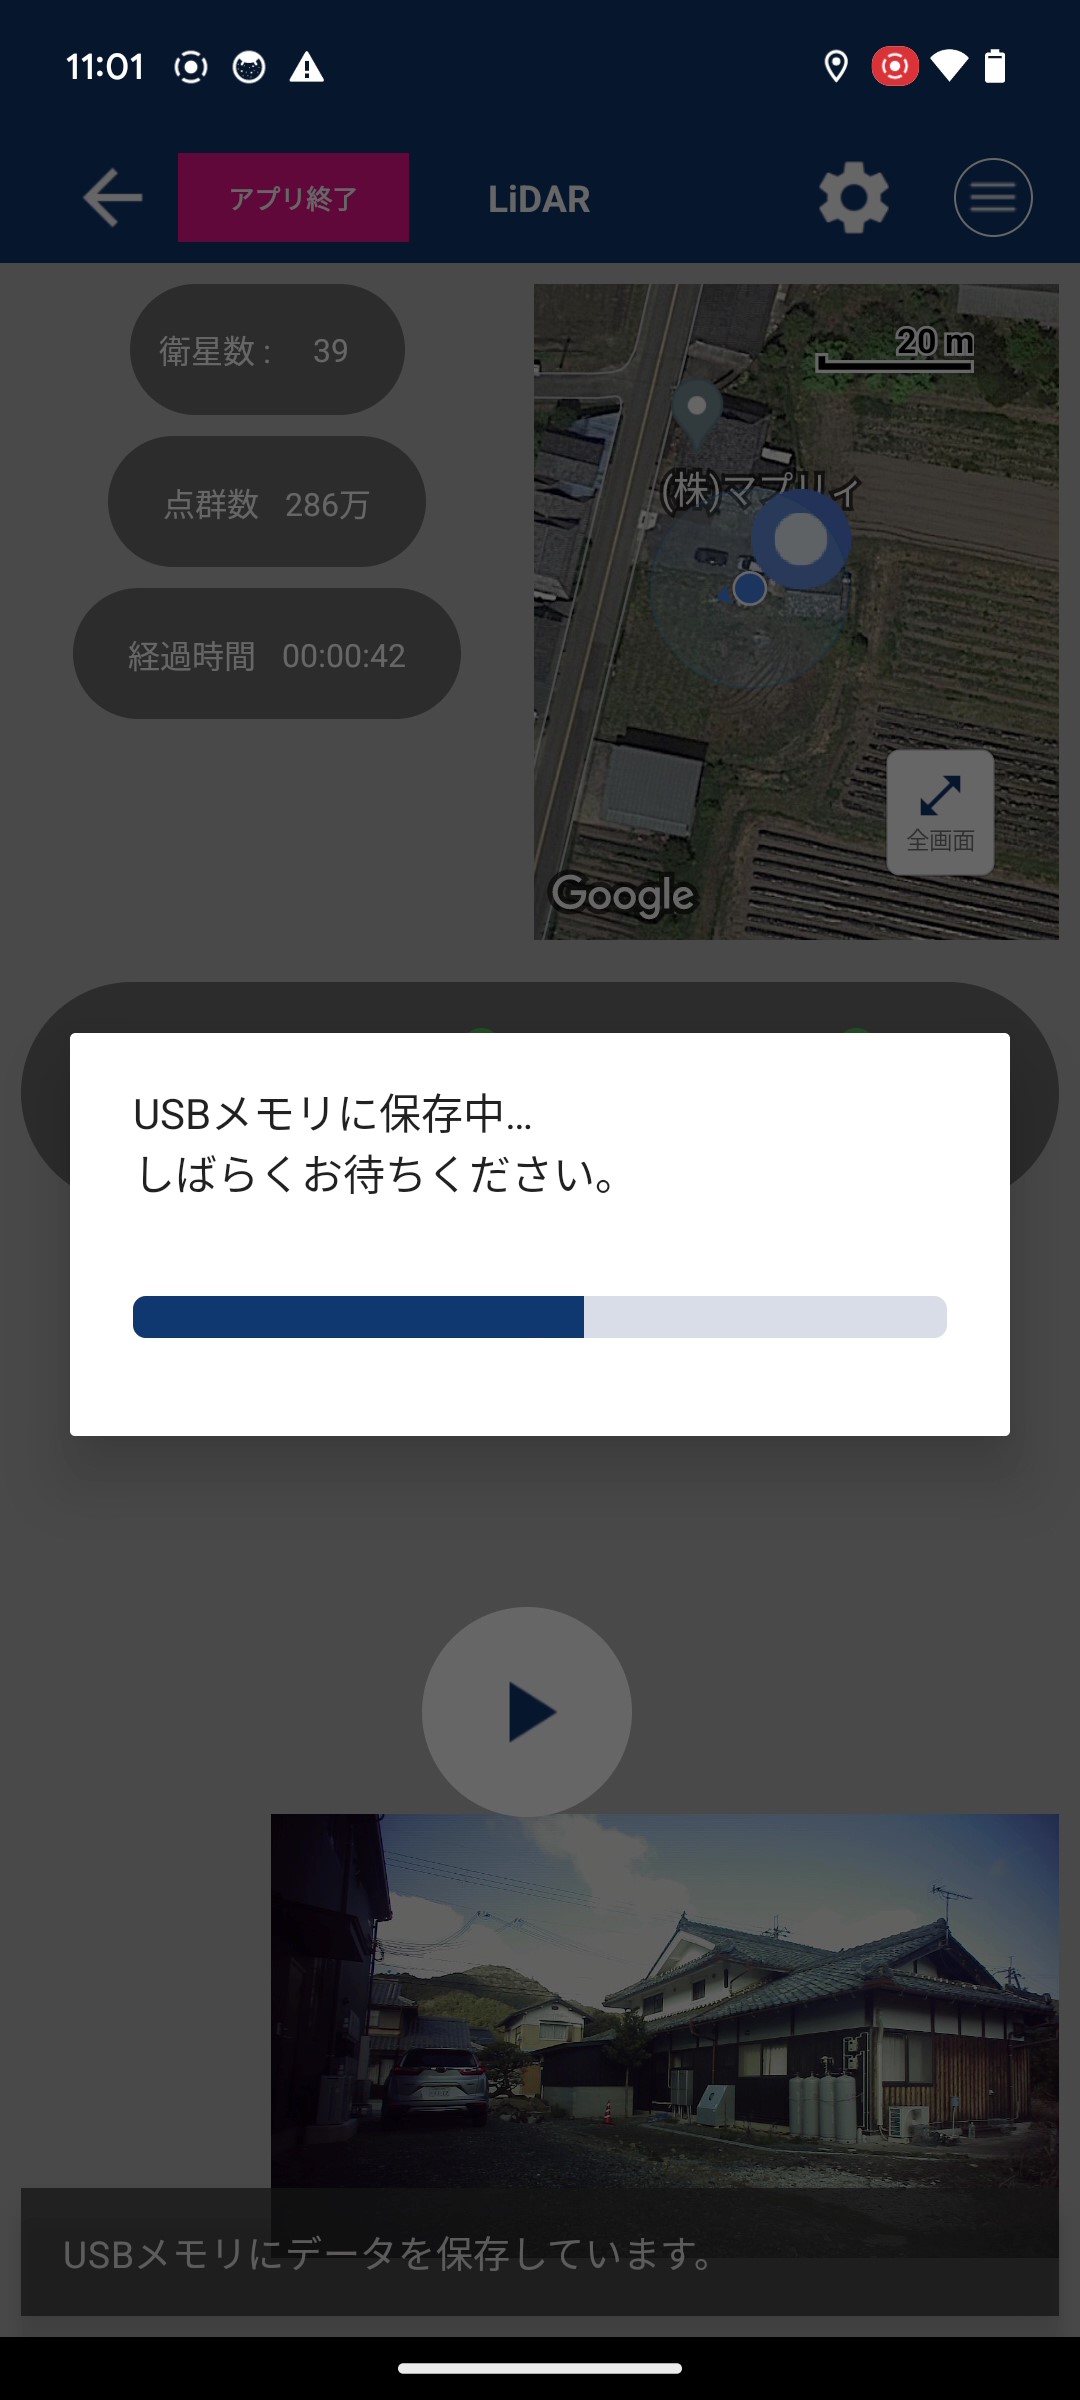
- After the message "Saving to USB has been completed" is displayed, the above dialog will be displayed.
When the dialog box disappears, the scan is completed successfully.
3. Displaying point cloud data on Android devices
3.1. Displaying the results list screen

When you tap the "Results List" button at the bottom of the screen, a list of the scanned point cloud data will be displayed, as shown below.

3.2. Connecting a USB memory

Remove the USB memory from the LiDAR case and connect the Android to the USB memory using a USB Type-C to Type-A conversion adapter.
3.3. Importing point cloud data

- Tap the USB memory recognition button.

- Allow access to the USB memory. Tap OK.

- A list of the files in the USB will be displayed, so select the files you want to import to your Android and tap the "OK" button.

- Importing to your Android device will begin, so please wait a moment.

- The list will be updated once the import is complete.
3.4. Displaying point cloud data

Display the results list screen and select the file you want to display.
The “Point Cloud Display” button will appear just below the center of the screen along with the number of selected files, so tap it.
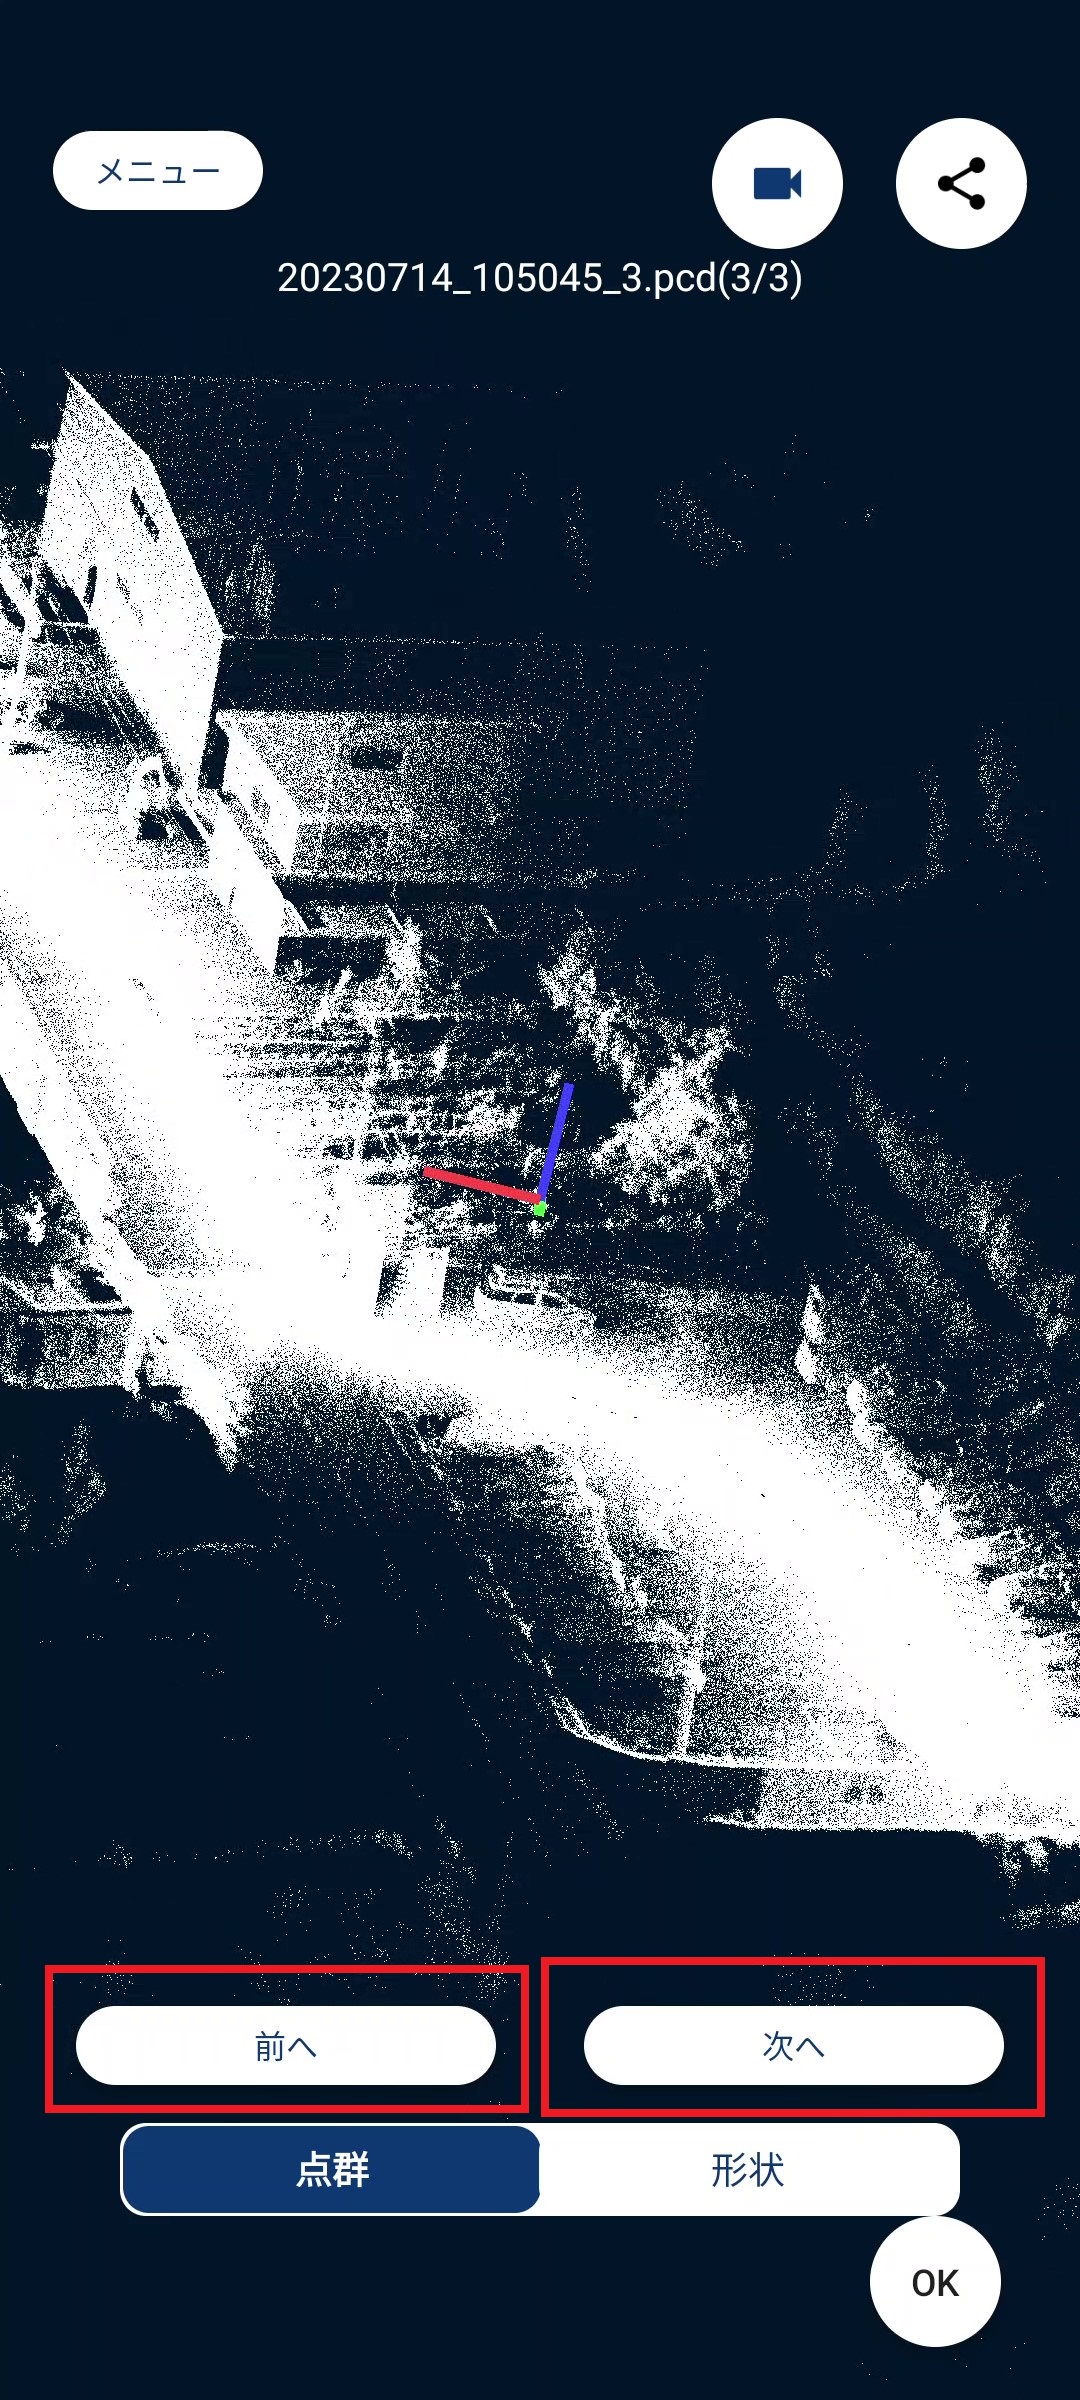
Tap the point cloud display to display the point cloud data. You can switch between the selected files by using the "Previous" and "Next" buttons.
You can also perform various point cloud measurements from the menu.
4. Other button explanations
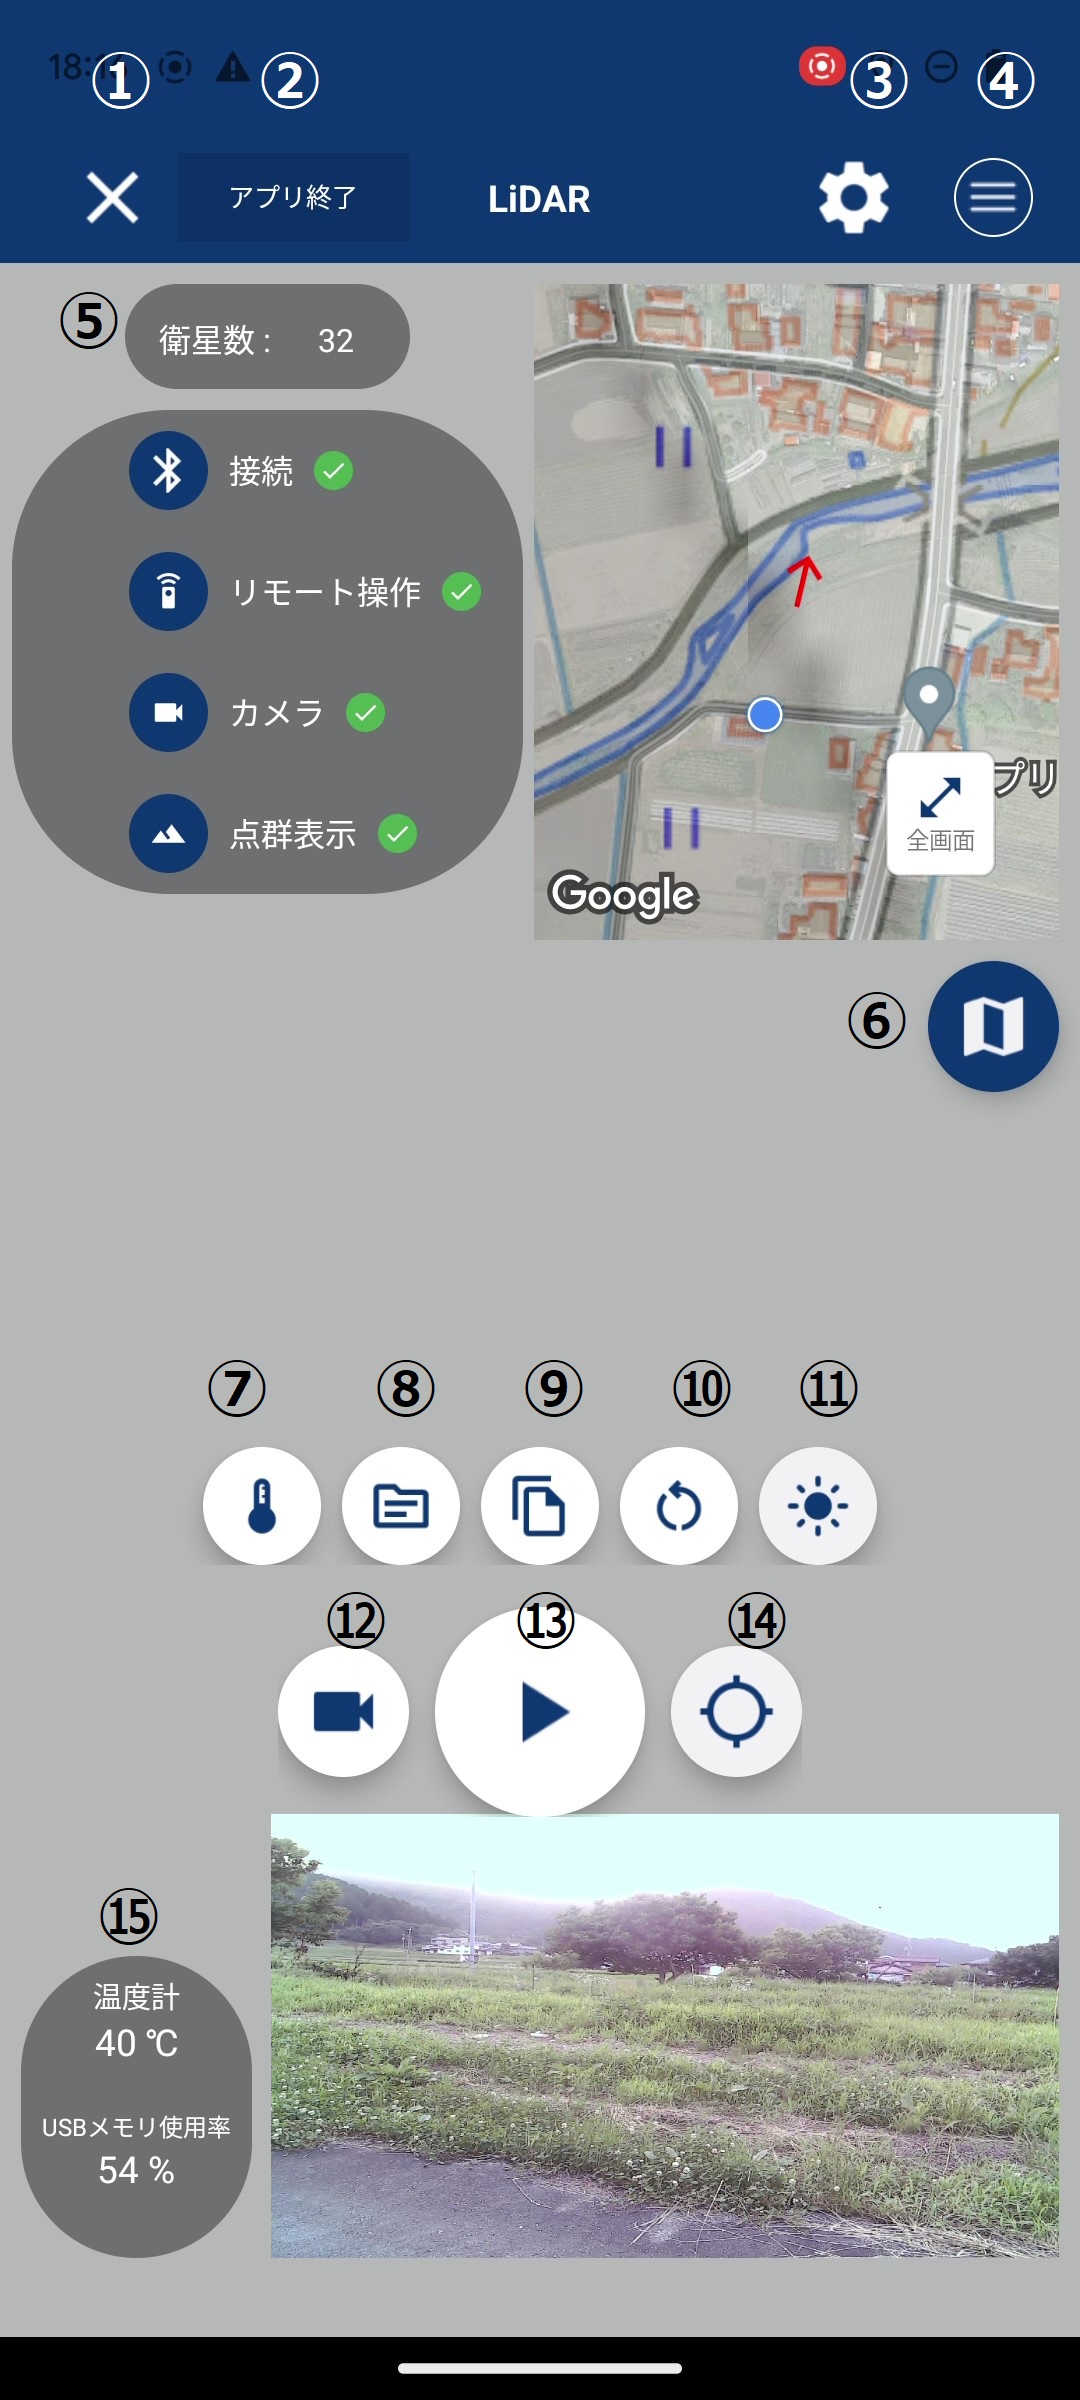
*As of Android version 1.0.57, the ⑥, ⑦, ⑪, ⑫, and ⑭ buttons have been discontinued.
① Close the operation screen. You cannot close the screen while scanning is in progress.
② This will disconnect the LA03 from the app, allowing you to safely close the app.
Checking the Shutdown button will shut down the LA03 unit as well.
Follow the instructions to close the app.

③ Display the settings screen.
④ Displays devices connected via Bluetooth.
⑤ If GNSS is connected, a value will be displayed for the number of satellites. Also, if the status is FIX, an icon will be displayed.
Tap the number of satellites column to display a list of reception status.
⑥ You can switch between map and point cloud viewer.
⑦ The device temperature and USB memory usage rate will be displayed in the thermometer column and USB memory usage rate column at the bottom left of the screen.
⑧ You can check the files in the USB memory.
9. Save the data to a USB memory stick.
10. Restart the app.
⑪ You can dim the screen of your Android smartphone.
⑫ Display the camera. (Use this when the camera is shaking or stationary.)
⑬ Starts/stops scanning.
⑭ Displays the crosshairs and compass.
When you tap the button, the sight and compass will be displayed in that order.


⑮ Performs the same function as ⑦.
5. Location of point cloud data storage in USB memory

The "mapry_la03" folder will be automatically created in the USB memory, and one folder will be created for each scan.
Folder structure
- Coordinate folder: Location information is saved.
- Marker folder: The acquired markers are saved here.
- Pose folder: The initial pose of LA03 is saved.
- Video folder: This is where videos are saved.
6. Software Updates
Please restart your device and app before performing a software update.

When an update is available, a message will appear at the top of the LiDAR screen.

To install the update program, click the buttons ①, ② in that order to display the Hardware Product Update screen.

If updates are available, click the "Download and Install" button.
When the update is complete, the message "mapry LA03 is up to date" will be displayed.
7. FAQ
- What should I do if the screen display does not allow me to proceed to remote operation?
If the following operations do not resolve the issue, the product may be broken. Please contact the customer support center listed on the warranty card.
- operation
Insert Type-A cable → Power ON → Wait 1 minute → Display LiDAR operation screen → Insert Type-C cable
- operation
- What should I do if I can't see the camera footage?
Tap the ② button in “ 4. Other Button Description ”, follow the instructions to close the app, and then launch the LiDAR screen again. -
What should I do if the video is frozen and blurry?
Tap button ⑫ under " 4. Other button explanations ." - What should I do if the device won't connect?
Close the LiDAR screen and display the map screen, which will display a layout where you can turn Bluetooth on and off from the top of the screen.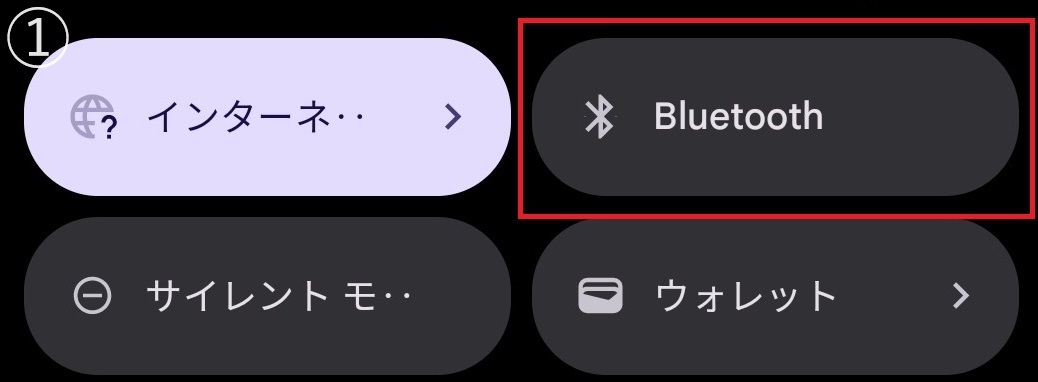
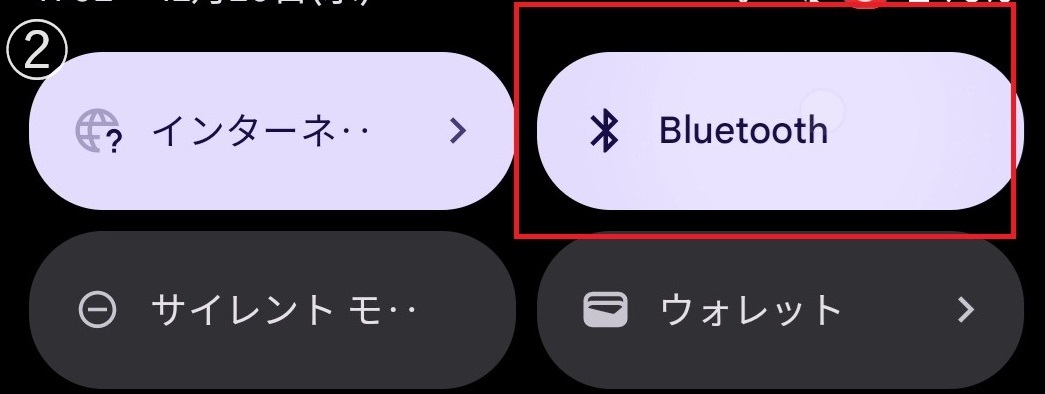
①Turn off Bluetooth.
②Turn on Bluetooth.
8. How to attach the strap
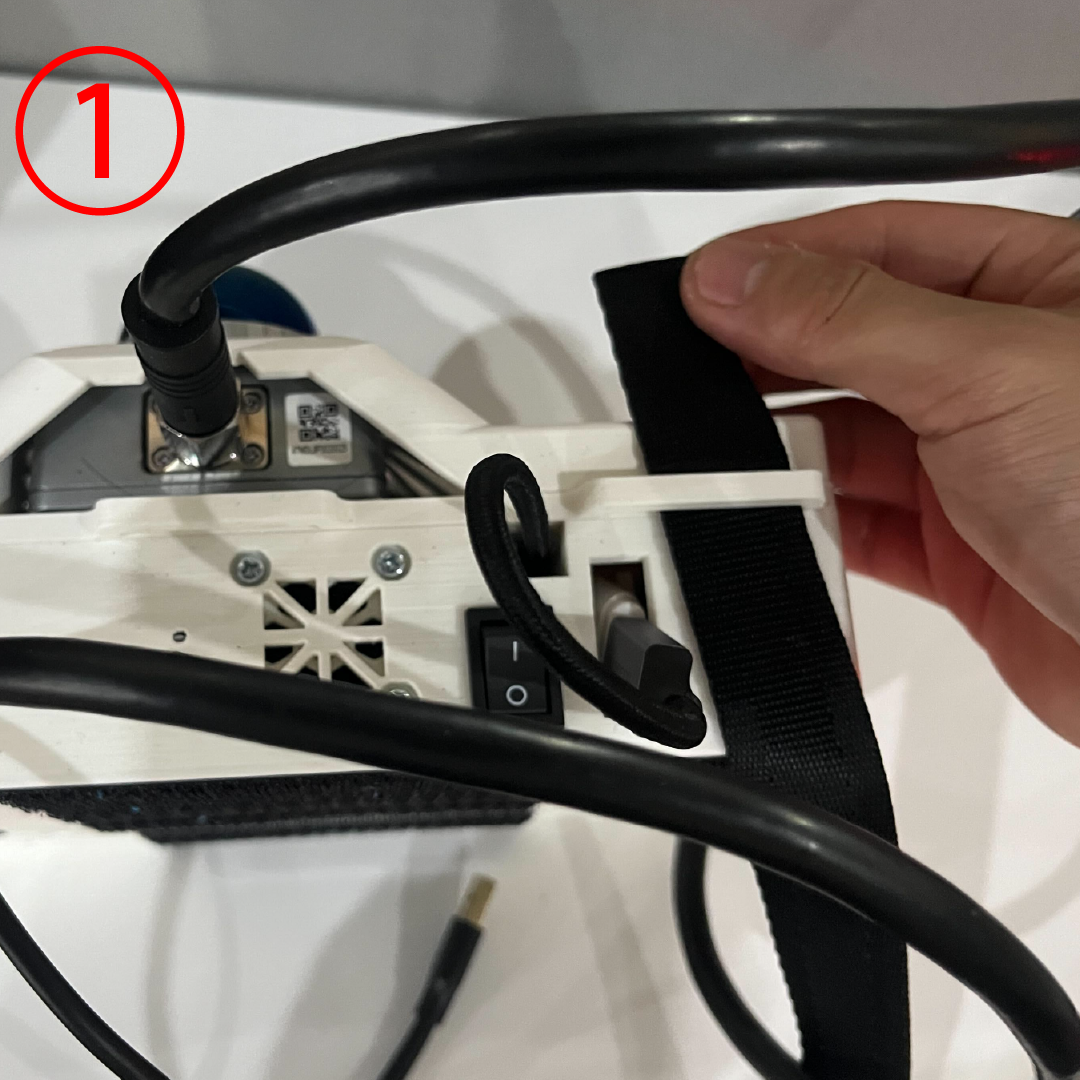
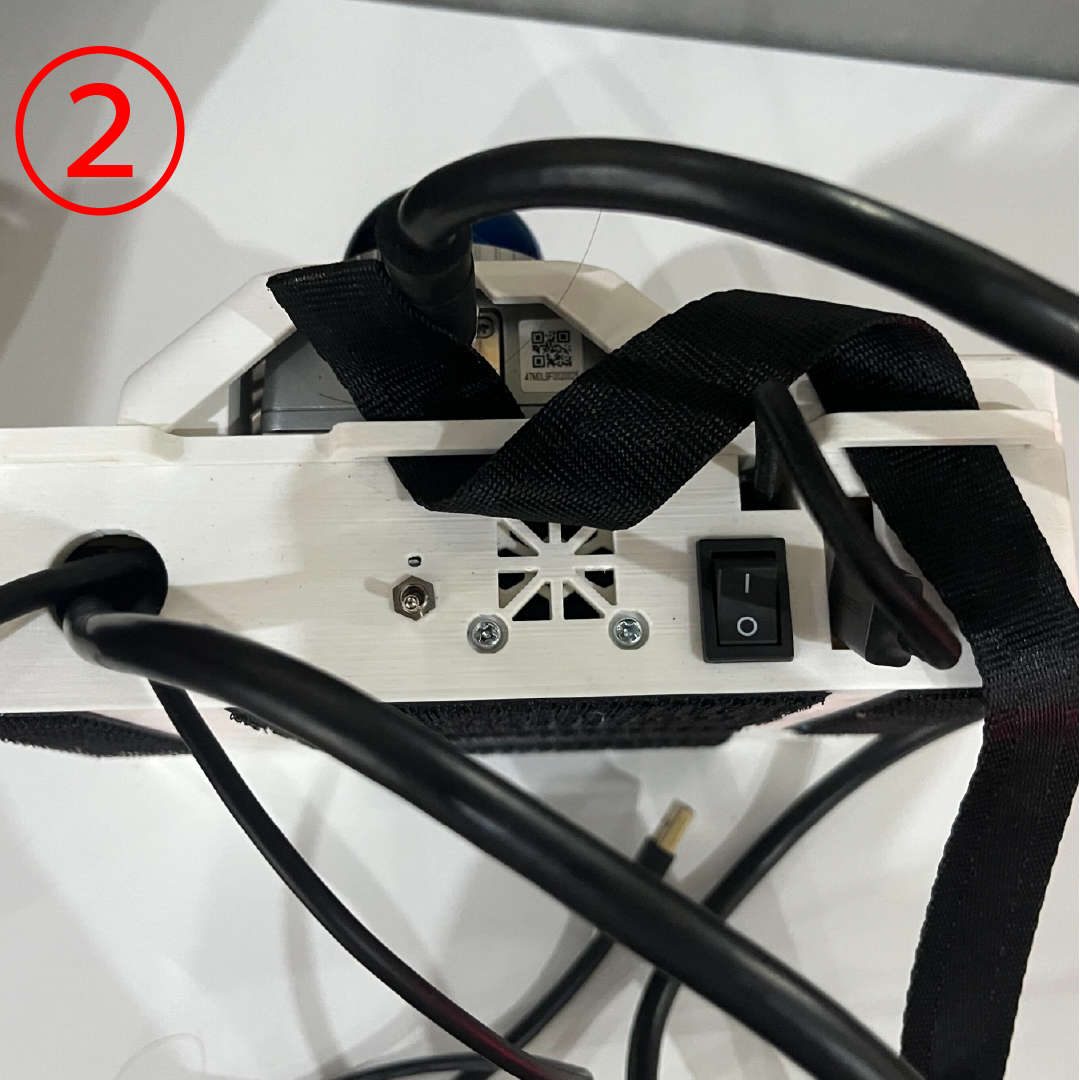
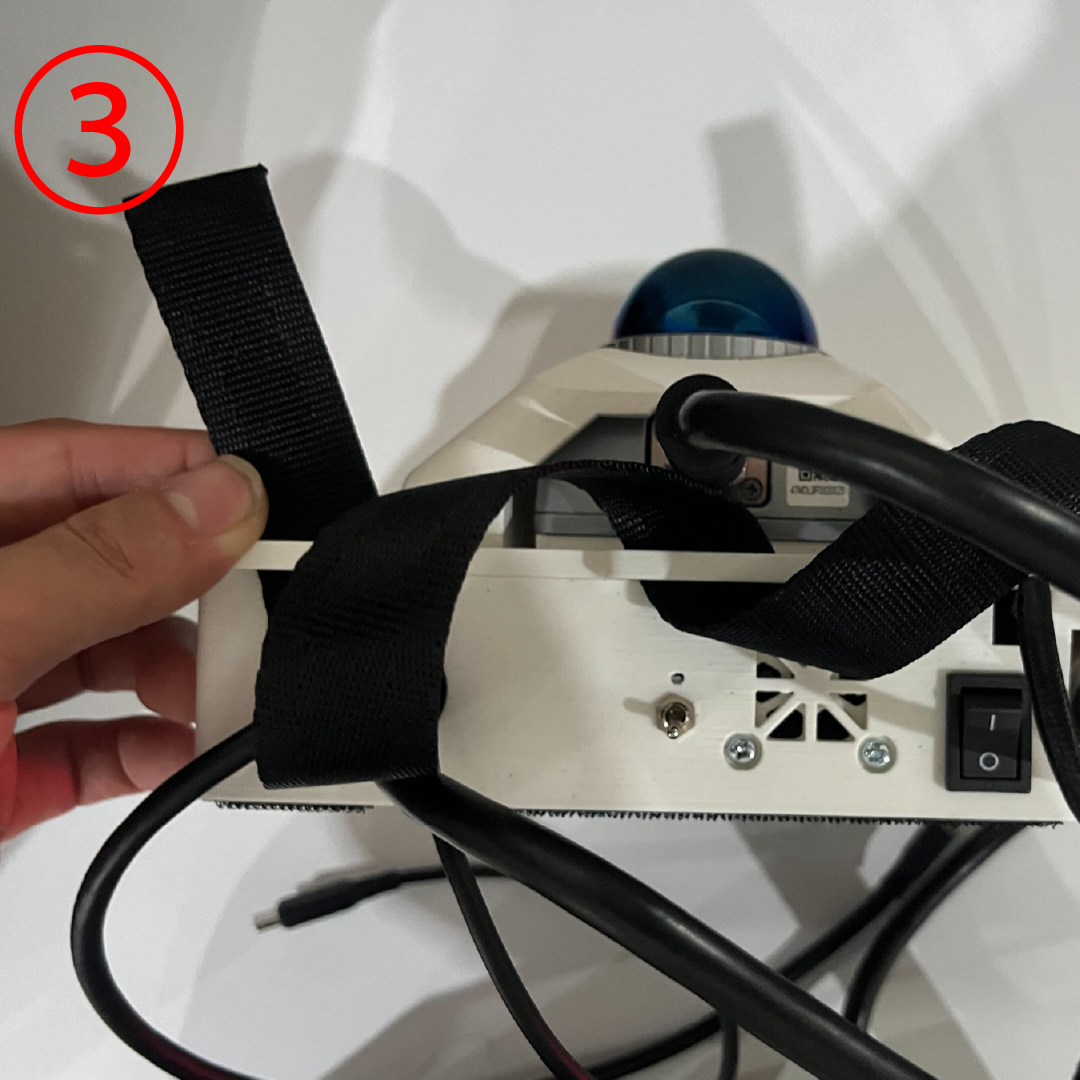
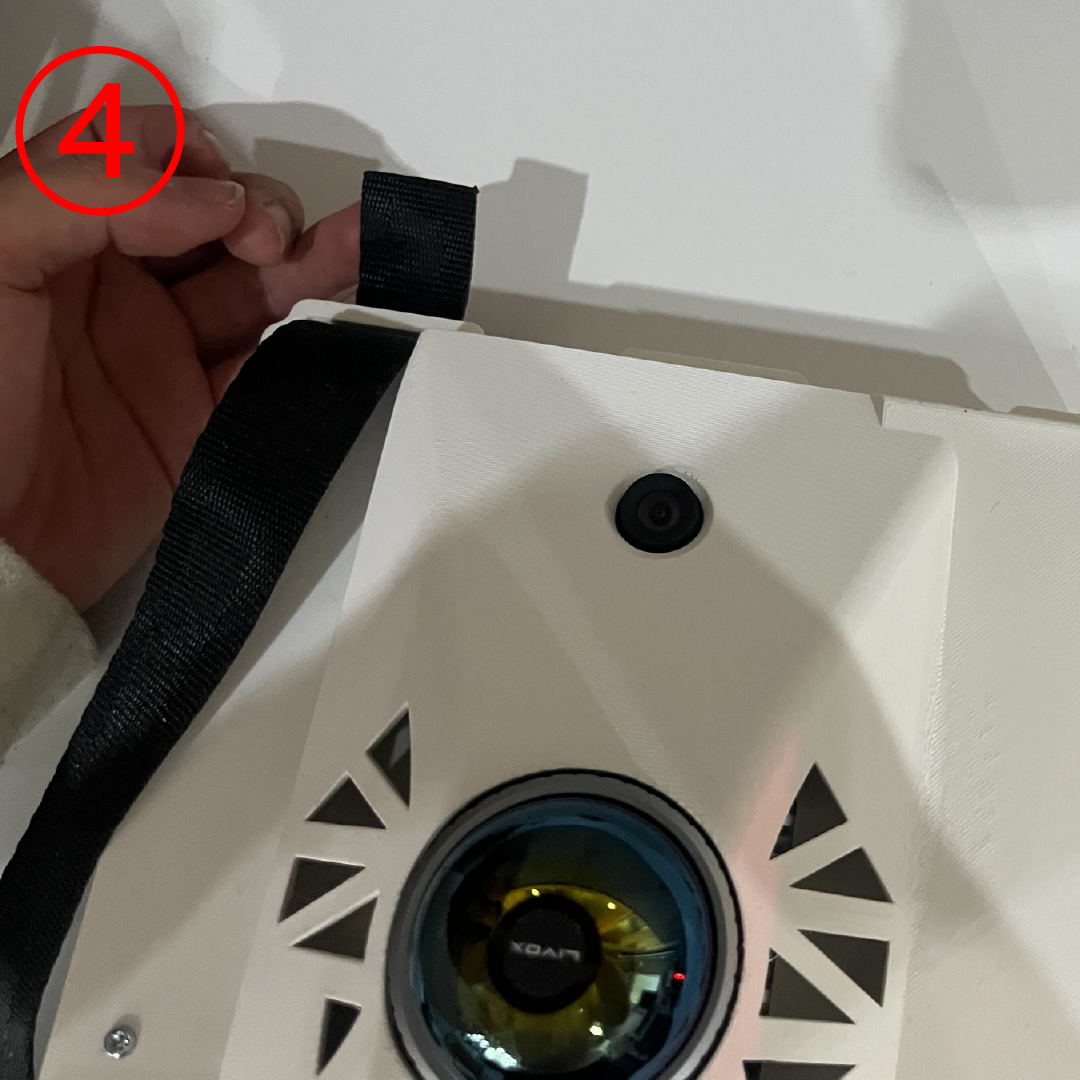
Pass the string through the holes on the right in order, in order from ① to ③, in a spiral pattern.
Then, pass the string through the bottom hole and stretch it towards the back.
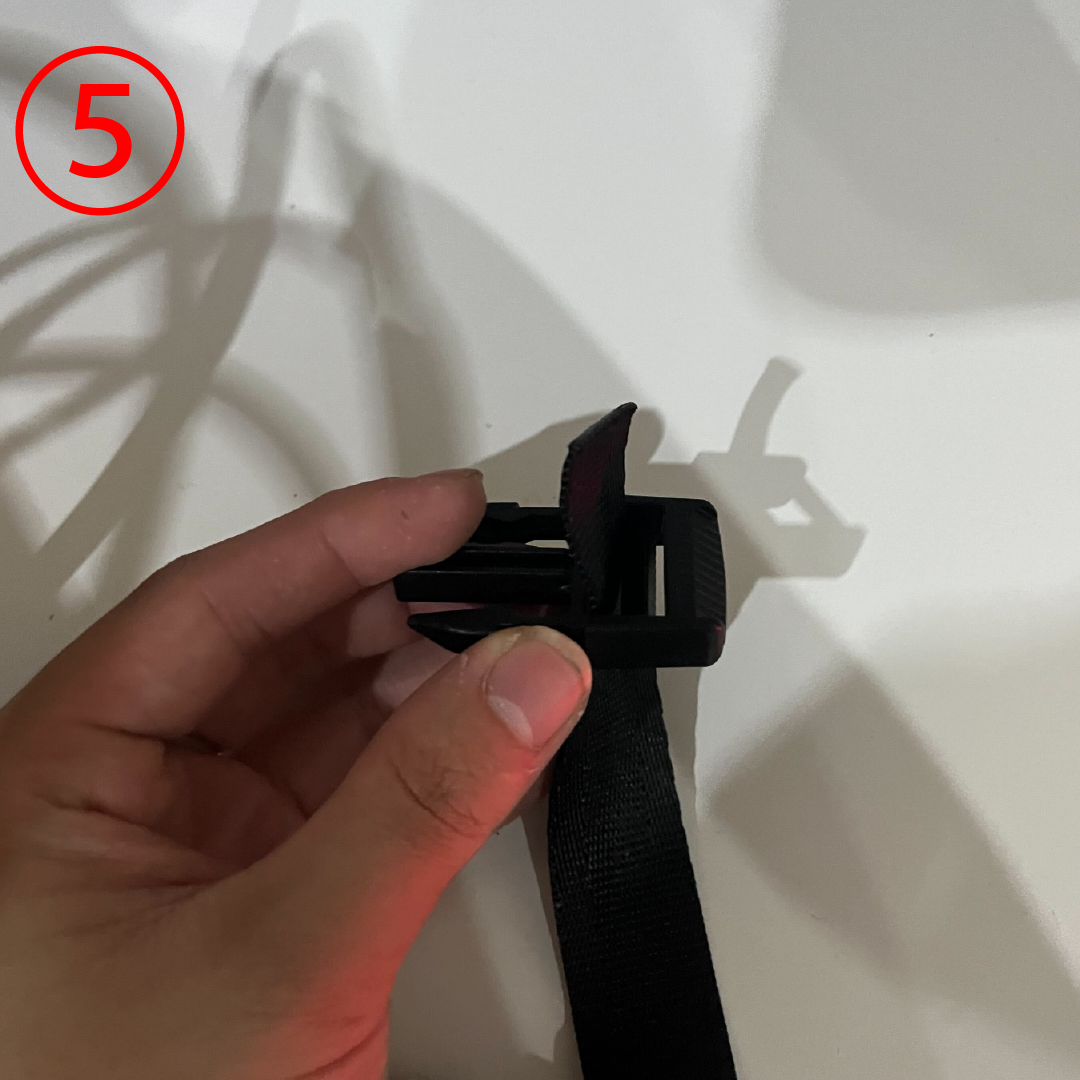
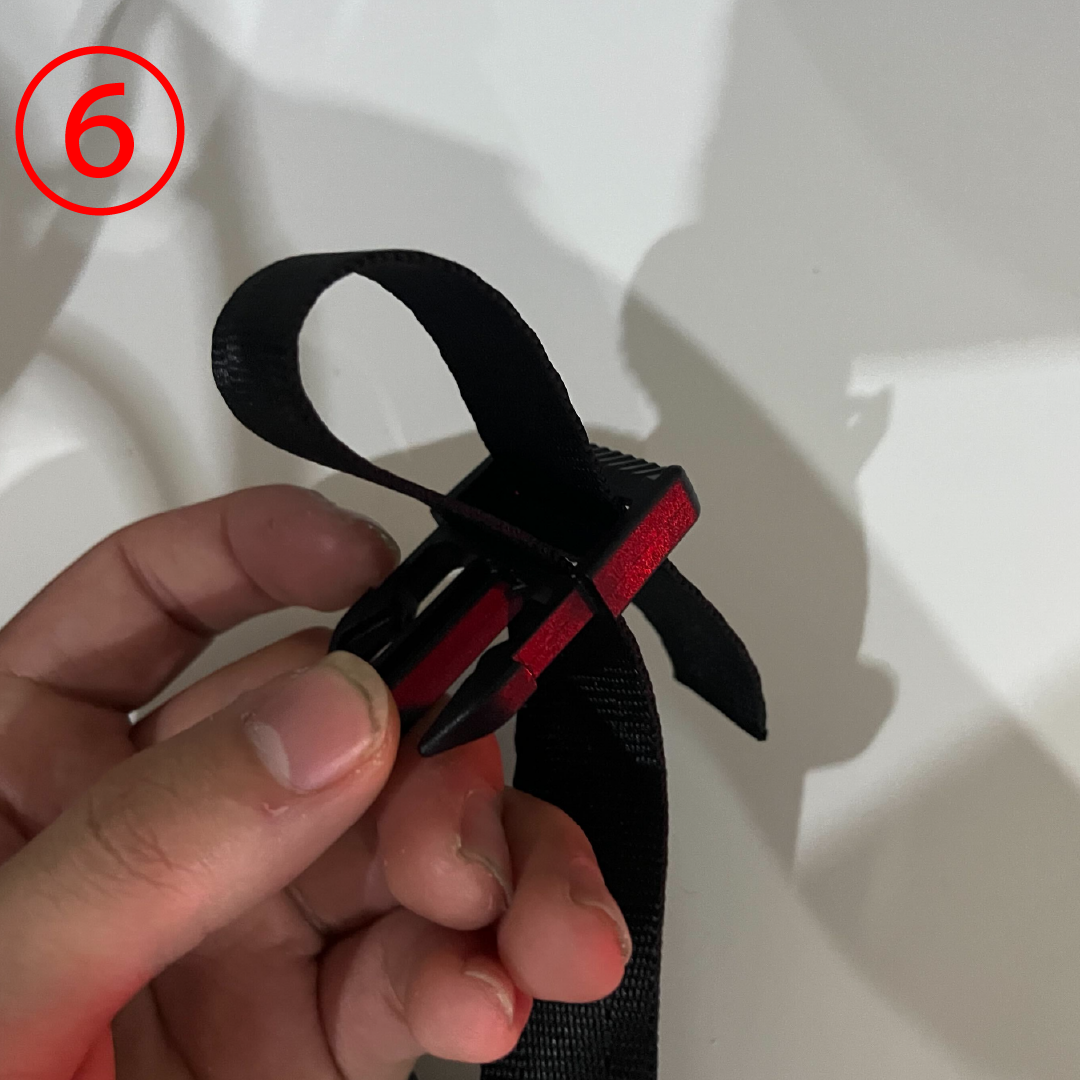
Attach the free end of the string to the metal fittings as shown in steps ⑤ to ⑥.
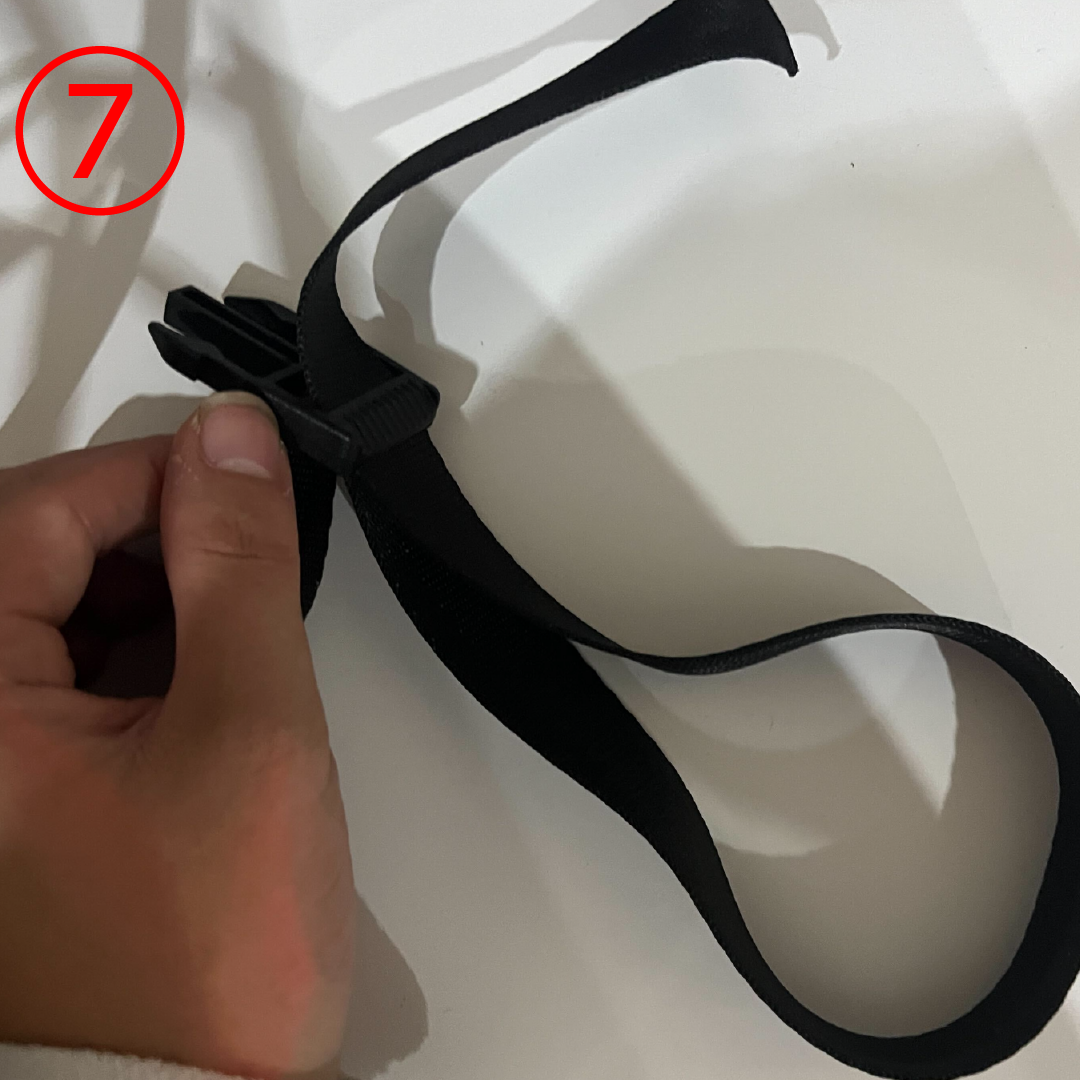
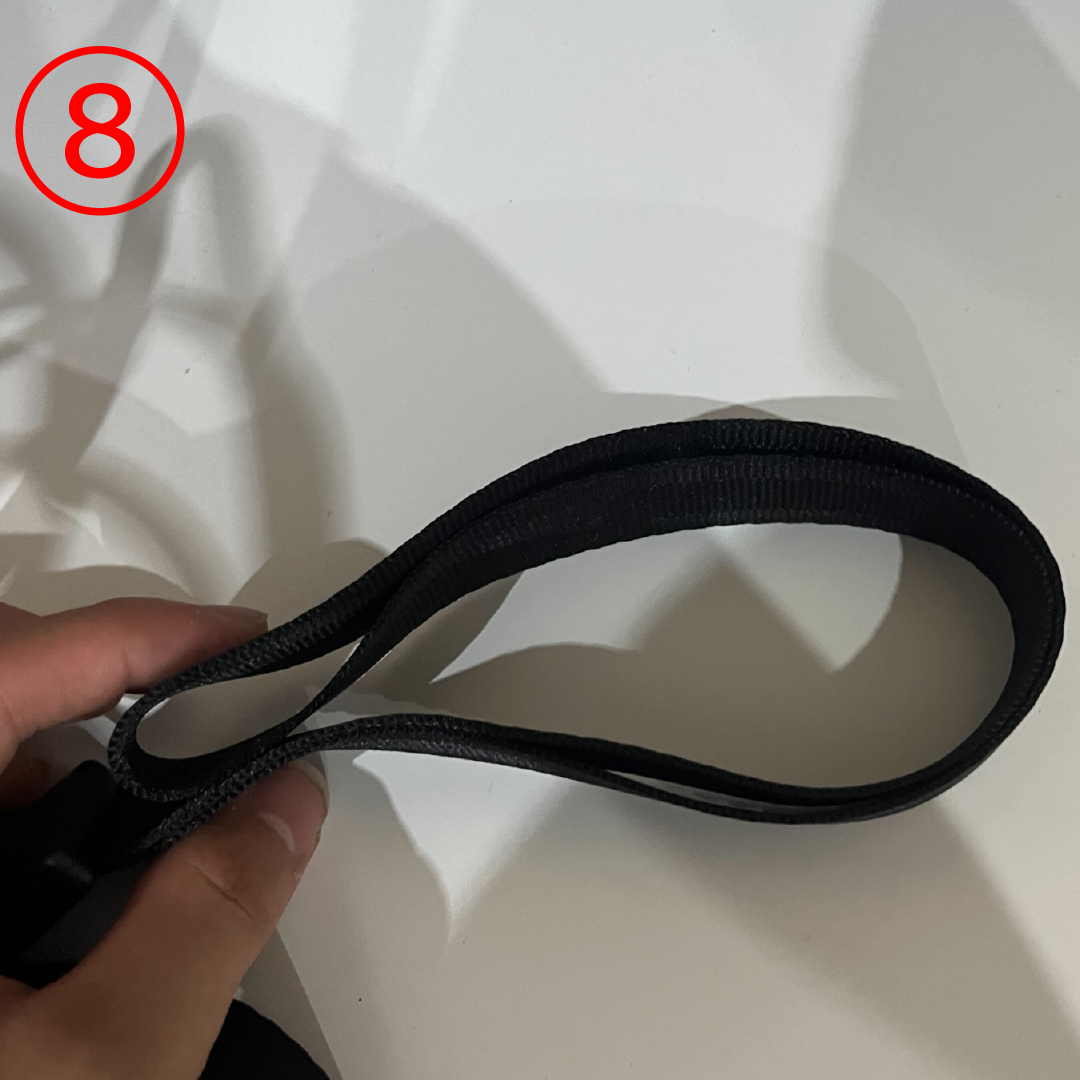
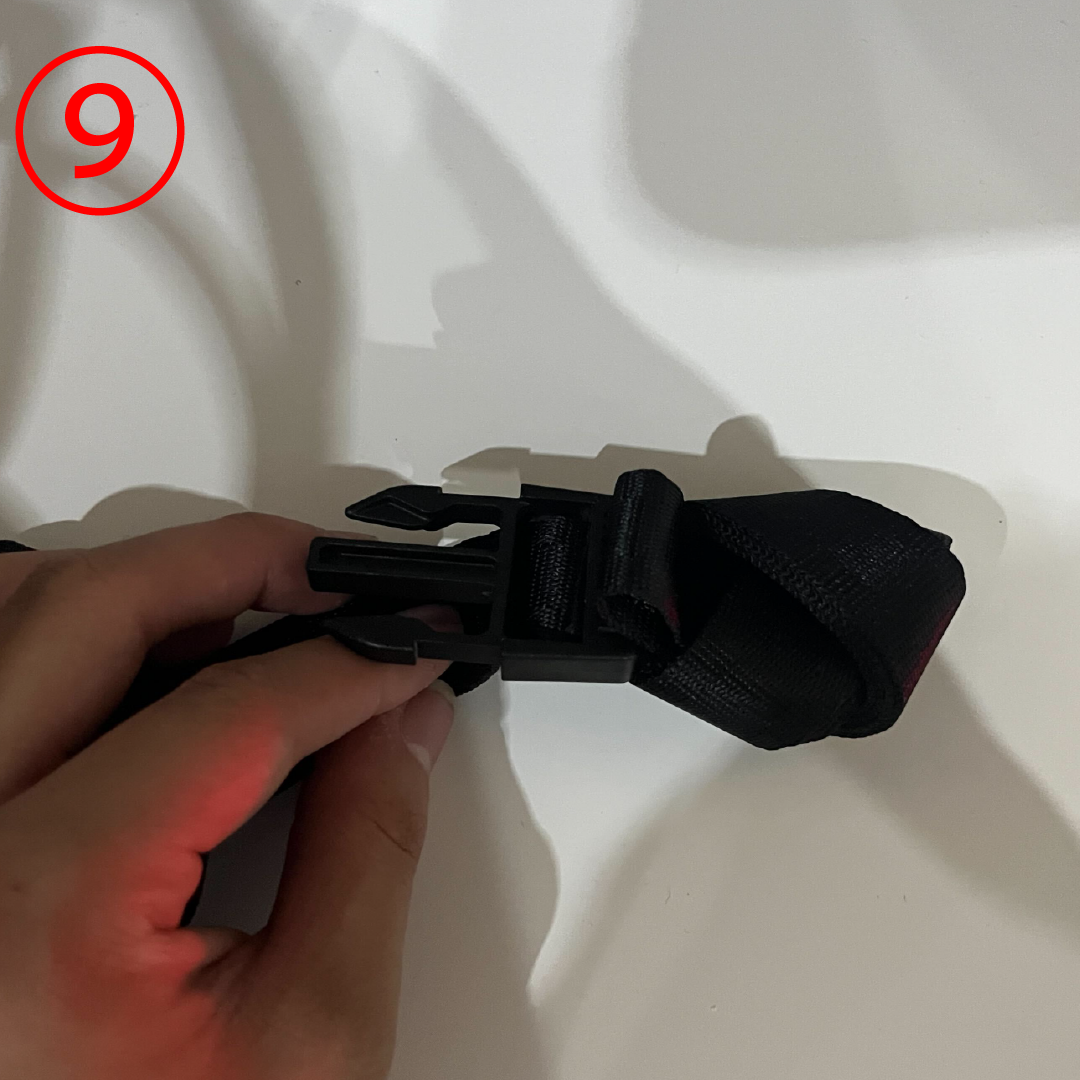
As shown in steps ⑦ to ⑨, tie the excess string so that it doesn't get in the way.
9. How to install the LA03
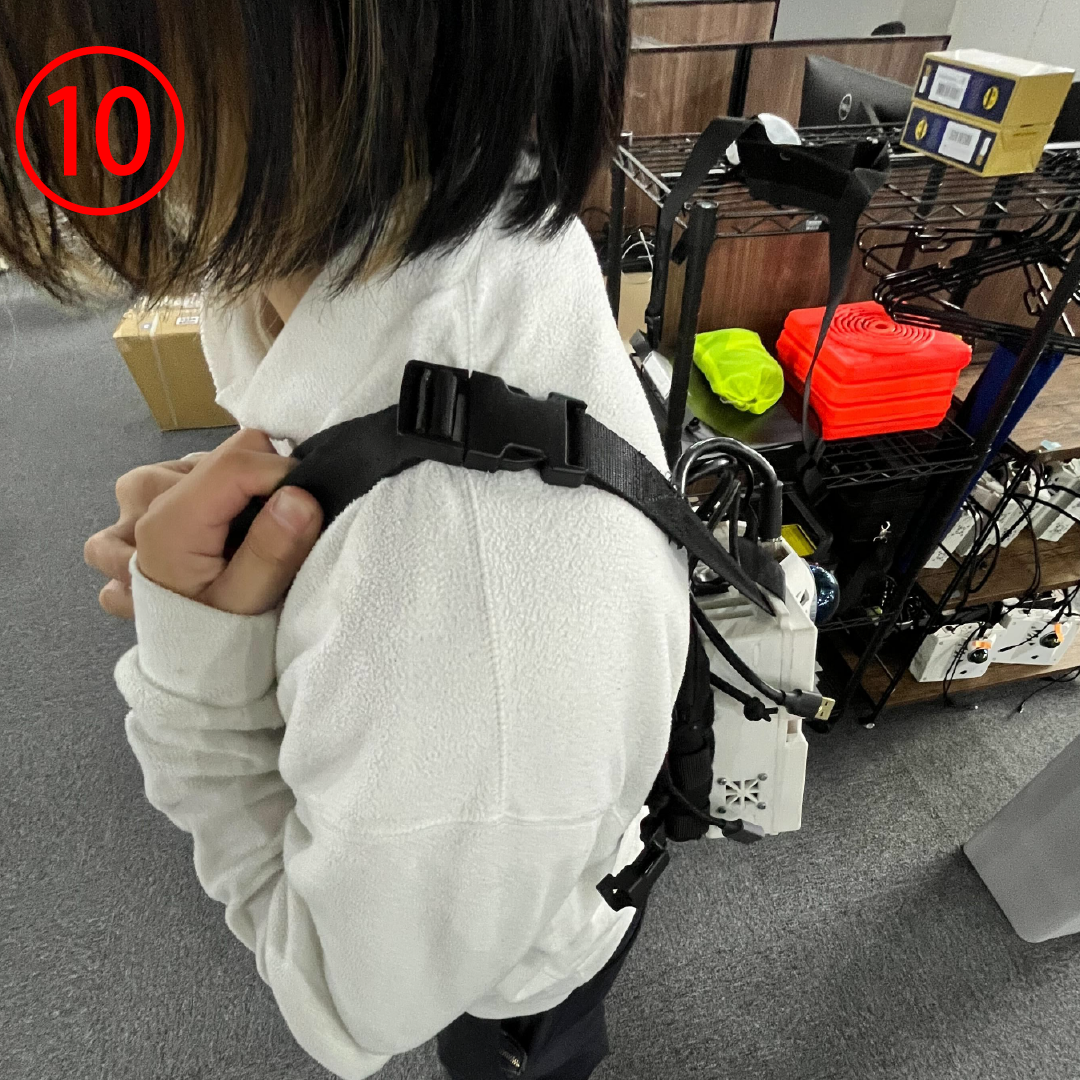
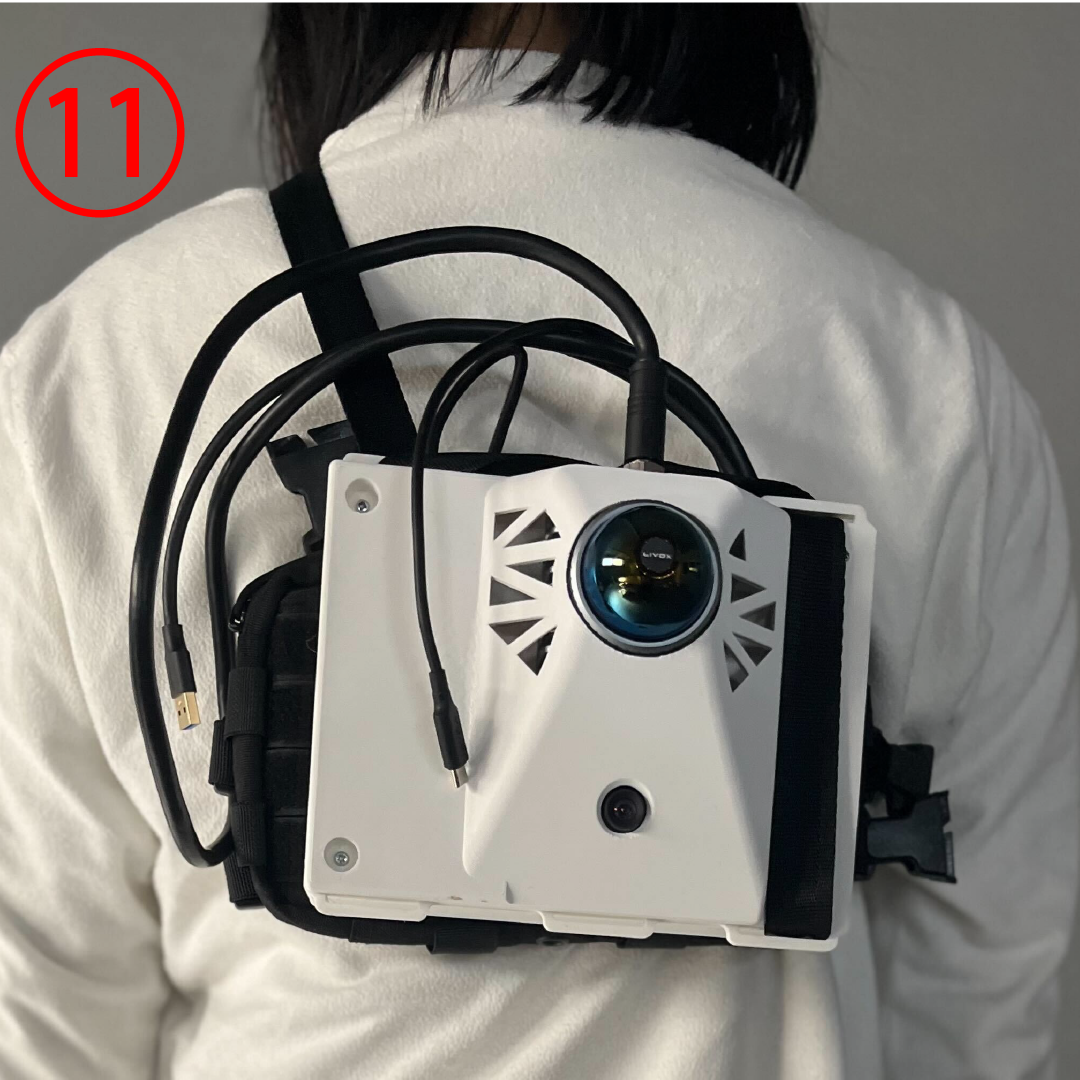
Place the string diagonally over your left shoulder and right armpit as shown in the figure.
Adjust the string so that the LA03 is straight and installation is complete.
*The H-shaped attachment that comes with the bag is no longer necessary with the current installation method. If you are unsure about the fixation, please use it as an auxiliary.
